Sunday, November 26, 2023

Using pop-up greenhouses to garden year round

Pop up, walk in greenhouse

Sunday, November 26, 2023

I like to garden as close to year round as I can.  Going to the garden daily gives me something to look forward to and the most nutritious produce you can eat.  As soon as a vegetable or fruit is picked, it starts losing its nutritional value.  Eating right after picking, maximizes taste and benefits.  Besides succession planting and picking varieties best suited for the season you are trying to grow them, a pop-up or portable greenhouse is a cost efficient and fairly easy way to extend the season into winter and then get a jump start in the spring.

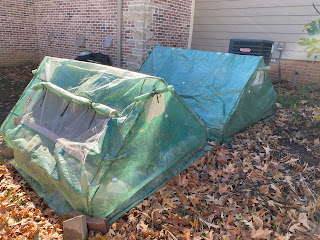
I just bought my third portable greenhouse.  I bought my first one in 2010 for around $40.  It was a smaller pop-up greenhouse that I was able to put 2 nice sized self-watering pots in and keep us in salads all winter.  The zipper finally gave out about 6 years ago.  I bought a larger portable greenhouse that is 6' wide x 5' deep by 3' tall to replace it in 2018 for around $45.  A couple of years ago, I bought a second one just like it.  The plastic material is started to degrade on the 2018 greenhouse and I can't get the same model any longer.  Last year, I just put a material row cover over the top of it during the coldest weeks and that worked fine so that is my plan for this year, too.

In the fall, winter and spring, I grow greens in these smaller portable greenhouses in self-watering pots.  As long as the greenhouse is closed up, you don't have to worry about watering as the moisture that evaporates, condenses on the inside of the plastic and drips back down on the plants.  I typically only water a couple of times after putting the covers on and closing them up.  If it is a warmer day and calling for rain, I pull off the covers to let them get a good soaking.

I also plant Austrian peas in with the greens.  You can plant those now and they will survive even uncovered all winter.  Under cover, they will give tasty pea greens through spring.  In early spring, you will get peas as a bonus.
Portable greenhouses
You can grow any cool season crops in a portable greenhouse.  I grow chard, celery, parsley, arugula, plantain, lettuce, peas, sprouting broccoli, cultivated dandelions and mustard greens.  You could also grow kale, spinach, radishes, turnips, kohlrabi, cabbage, broccoli, cauliflower, collards, or carrots.  I grow Egyptian walking onions in a pot that I leave uncovered.  You could grow onions in a greenhouse.  You should grow what you will eat the most often.  I like greens because you get a lot for the space and you can harvest the outside leaves and the plants will continue growing new leaves.

Plant growth slows to a crawl towards the end of November until the end of January because daylight is less than 10 hours and it is really cold.  The optimum plan is to have your cold season crops to full size before the end of November so you can harvest from them until spring.  Keeping your greens in a greenhouse does keep them warmer so you will get more growth on the plants than if they were in the garden bed.  Come February, growth really starts popping.

This fall, I ordered a pop up, walk in greenhouse for $148.  It is 8' wide x 6' deep and easy to walk in to.  I have put all my potted peppers and eggplant along with my tropicals.  I am seeing how far I can extend the harvest of the peppers and eggplants.  So far, I am still getting fruits off both.  I will move my tropicals into the basement and keep them under grow lights when it starts getting below 20F.  My tropicals don't do nearly as well inside as outside so I am trying to minimize their indoor stay.
Lettuce inside my first pop up greenhouse in January
After I take the tropicals out, I have native ferns, native flowers, and herbs I separated last month and transplanted into 4" plastic pots that I will move into the greenhouse in their spot.  I hope to improve their survival rate and give them a jump start come spring.

Speaking of spring, I will add metal shelving units to the walk in greenhouse so I can start peppers, tomatoes, eggplant, squash and okra in it.  I will try starting the seeds indoors and moving into the greenhouse as well as just starting the seeds in the greenhouse to see which method works the best..  

Long term, I'd like to do a larger greenhouse that you run pipes under the ground and back into the greenhouse so it keeps the greenhouse warm without having to put a heater in it.  I may be able to keep my tropicals, tomatoes, peppers and eggplants growing all winter with that set up.
Saturday, November 25, 2023

The winter slow down

Outdoor potted lettuce
Saturday, November 25, 2023

If you have noticed that plants seem to stop growing in the winter, whether indoors or out, you would be right.  Growth slows as temperatures fall and sunlight decreases.

Basically, plants become almost dormant when receiving less than 10 hours of daylight at cold winter temperatures.  For my latitude, daylight of less than 10 hours is from November 24-January 21 this winter season.  You can look on the weather channel to see when your daylight hits 10 hours.

When planting in the fall for winter crops, I try to get my veggies to full, harvestable size by November 24th when daylight hits less than 10 hours (I add 14 days to be on the safe side for the cooler temps of fall and less daylight than in spring to the seed package Days to Harvest time).  They will remain basically this size until the end of January, when they begin regrowing.  If growing in a greenhouse, the warmer temperatures will help plants grow, but at a much slower rate than during longer daylight times.

I have full size Ruby Streaks mustard, a couple of varieties of chard, celery, Giant Blue Feather lettuce, tatsoi, Giant sweet mustard, arugula, cultivated dandelion, plantain and purple sprouting broccoli.  I started lettuce in September but it still isn't to full size.  The three varieties that sprouted were Red romaine, Winter Crop and Landis Winter.  I transplanted them this week into my self-watering pots that I will cover with a portable greenhouse cover when the temperatures start getting into the 20's.  I fertilized all my greens, too.  

The same techniques for protecting spring crops work for your fall and winter gardens.  
Protect your new plants from a late frost
Preparing for a hard freeze
Lettuce and greens in January under a portable green house
Growth starts back up at the end of January, for indoor and outdoor plants.  The lettuce, chard, sorrel, cabbage, kale, celery, and herbs that have overwintered will start growing with vigor again after this time with clear days and warmer temperatures.

Covering plants with row covers or portable greenhouses can help your plants grow; warmth does make a difference.  Just don’t expect significant growth until we get back to at least 10 hours of sunlight.

Sunday, November 19, 2023

Growing milkweed for butterflies

Butterfly milkweed with Monarch caterpillar
Sunday, November 18, 2023

Milkweed is a favorite of pollinators for pollen and the food source for monarch butterfly caterpillars.  Milkweed's botanical name is asclepias and is native to much of North America.  Tropical milkweed (asclepias curassavica) is not recommended to be planted as it's bloom time is out of sync with monarch's life cycle and migration.

Look for native milkweed varieties to plant in your pollinator garden.  Varieties like common milkweed (asclepias syriaca), rose or swamp milkweed (a. incarnata) and butterfly or butterflyweed milkweed (a. tuberosa) are all readily available and good choices in the Midwest.  In our area, additional native varieties are purple milkweed (a. purpurascens, state special concern), white milkweed (a. variegata), whorled milkweed (a. verticillata), and green milkweed (a. viridis) are showy.  Additional natives in our area are clasping milkweed (a. amplexicaulis), poke milkweed (a. exaltata), prairie milkweed (a. hirtella, state threatened), aquatic milkweed (a. perennis), four-leave milkweed (a. quadrifolia), redring milkweed (a. variegata), and spider milkweed (a. viridis).

Showy milkweed and common milkweed love to self-sow so put them where you are okay with them filling in the area.  The other option is to pick the seed pods before they open.  Once they have dried and after the first frost of the fall season, go pick all the pods.  You can also leave them on the plant and put a string around the pod so that it cannot open to release the seeds to stratify them in place.   You'll have plenty of seeds to give to friends and family.

Most milkweed varieties need lots of sun to flourish.  Be sure to give it a sunny spot in the garden.  When you see sacks (chrysalis) and caterpillars covering the plant starting in June, don't freak out, these are just monarch butterflies.  Monarchs arrive in our area as early as April and most head back south in September.

Some milkweed varieties will flower the first year  they are propagated like Rose milkweed.  Some will not flower until the second year like Butterfly milkweed.  Check the variety you are starting from seeds to know if you can expect flowers in their first growing season.  

All native milkweed has a milky sap that can be irritating to the skin and eyes if touched.  The exception is butterfly milkweed; it does not exude a milky sap when a stem or leave is broken.  All parts of milkweed plants are toxic as they contain cardiac glycosides.  If pulling plants or trimming, gloves are recommended.  Be sure to wash them after handing milkweed plants. 

Milkweed can be hard to start from seed if you are planting in the warmer months.  The easiest way is to sow the seed in the fall.  Milkweed requires a "moist stratification" period of several weeks.  What this means is that the seed needs to be exposed to moisture and cold temperatures.  If you are planning on starting seeds indoors or outdoors in the spring, you can mimic these conditions by putting the seed in a moist paper towel in a ziplock in the refrigerator for 30 days.

You can then sow the seeds indoors or outdoors.  Ideal germination temperature for seeds are 75F.  Seeds will germinate in about 7-10 days at this temperature.  Soaking seeds in warm water for 24 hours after removing from the refrigerator and then planting improves germination rates.  If starting indoors, sow seeds 6-8 weeks before last frost.  If starting outdoors, sow after the last frost.  You will have to stratify to get good germination rates.

For starting indoors, use seed starting mix, fill the peat pots or seed flats, water well and let drain.  Then sow the seeds and cover with 1/4" of additional seed starting mix.  Mist the top of the soil to get this upper layer moist and cover so soil stays moist until the seeds sprout.  Remove cover as soon as seedlings emerge.  A fan on low directed over the seedlings can help the stems, making for sturdier seedlings.

Seedlings will be ready to transplant outdoors when they have 3-4 true leaves and danger of frost has passed.  

You can use a greenhouse to be able to get an even earlier start.  You can move your seedlings to the greenhouse when they have 2 true leaves and 6 weeks or so before your last frost date.  In my area, the last frost is around the first of April.  If I back up to when I should start stratifying my seeds, this is what it would look like.  
1 month stratifying + 1 week germinating + 3 weeks to get to 3-4 leaves + 6 weeks in greenhouse

So for our last frost date of April 1, I would start stratifying in mid-December, have seedlings by end of January, seedlings with 3-4 true leaves by mid-February that are ready to put in the greenhouse for 6 weeks, and transplant out to the garden in early April.

When you go to transplant butterfly milkweed, it has a long taproot.  If you break the taproot, the plant will not survive.  Be careful when removing this plant from a flat or you can start in peat or coir pots that you can plant in entirety in the garden.

Saturday, November 18, 2023

What I learned in the 2023 gardening season

Walk in, portable greenhouse
Saturday, November 18, 2023

Late fall is a good time to reflect back on the 2023 edible gardening season and capture what you learned and any changes you want to make in your garden for the upcoming season.  If you wait until spring, you may forget key things you want to try in 2024.    This is my 14th year doing edible gardening.  I learn new things every single gardening season.  

Here are my learnings for this growing season, so far.  
1.  Marigolds are supposed to deter cabbage moths.  My husband likes marigolds and they also deter deer if you get the really fragrant ones.  I will try to interplant my sprouting broccoli with marigolds next year in addition to planting them around the perimeter of my garden beds.
2.  Pole beans need to be fertilized monthly.  I had read that legumes fix nitrogen on their own roots so there wasn't a need to fertilize.  My pole beans were not doing the best this year so I used an organic fertilizer on each of the pots.  All varieties started producing many beans.  Next year, I will fertilize all my pole beans monthly.
3.  You can grow indeterminate tomatoes upside down in 5 gallon buckets.  We read that determinate were the ones to grow using this approach but tried my husband's favorite indeterminate.  We had to do some tweaking on the approach over the summer, but they did very well!  We will do it again next year.  We will use fresh soil, half bagged garden soil with some of our clay soil at the bottom.  Continue to use a drip watering system that waters for a short period of time twice per day.  Keep the plants trimmed to 5' in length; any longer and the center of the vine dies out.
4.  Read that once a tomato starts turning color that the fruit no longer takes nutrients from the vine so you can go ahead and pick to ripen on the counter without effecting the flavor.  I was picking them at this time any way to keep the critters from eating them, but happy to know that the nutrition and taste aren't effected!
5.  Our soil is alkaline to begin with.  I grow most of my edibles in my flower beds which are mulched.  Mulch is also alkaline so my edible garden bed just keeps on getting more alkaline.  Most veggies like a pH between 6.5-7.5.  Since ours was bumping up against a pH of 8.0, we added sulfur this spring at a rate of 4 pounds per 1,000 square feet of garden to try and lower it by about 0.5.  Our pH did not seem to change at all.  In reading, clay soils require more sulfur to make a change.  Also recommend that you add amendments in the fall as it takes some time to move the pH depending on the type of sulfur.  Will add 15 pounds per 1,000 square feet to the beds this fall and re-test in the spring.  Will also go ahead and add phosphate, too.  Will add nitrogen right before we mulch to keep it in the soil.
6.  Cock's comb, Love Lies Bleeding, Heavenly morning glory, Hummingbird Vine and Red Malabar spinach are self-seeding well.  Can just replant volunteers when they come up; no need to start or buy these.
7.  Warsaw spaghetti squash died from disease early in the season; only got 2 fruits from the vine; was supposed to be disease resistant.  Mashed Potato squash died before it produced any fruits.  Galilee spinach bolted very early and was supposed to be very heat tolerant.  May try the spaghetti and Mashed Potato squash once more.
8.  2 rounds of planting tomatoes works well.  I started one round in early May and a second in June.  When the May plants started dying down in August, the June plants started producing.  Will likely continue to do this for at least a couple of varieties that I want to keep in fresh eating.
9.  Morning glory and Moonflower vines should not be in a pot with anything else.  The support trellis for a potted morning glory vine should be put into the ground as the vine just gets too heavy for the trellis to remain upright in a pot.
10.  Removing tomato leaves with spots did seem to help the vines keep producing.  Need to prune as well to keep the vines from falling over the tomato cages.  When the vines get really long, they die out in the middle so you don't gain anything by letting them grow too long.  Also makes it easier to harvest, keeps the greenery off the ground to reduce chance of disease and makes it harder for varmints to snatch the fruits for themselves.
11.  Tried fertilizer stakes this year.  I am sure they are more expensive than bagged fertilizer but are easier to get under cover than the granules.  To get the granules under cover, I have to pull back the mulch, sprinkle on the fertilizer and then move the mulch back over the fertilizer.  Will have both next year so when I think I am too busy to use the granular fertilizer, I can convince myself to just poke the stakes in.
12.  We got way too many tomatoes this season!  Will need to cut back significantly next year.  I filled the freezer and still have 40 more quarts of frozen tomatoes that I made into 47 pints of sauce; enough for the next 4 years!  We used about 11 per year over the last couple of years.
13.  I need to start documenting what I am putting in the freezer, drying and canning so I do a better job of not over planting.  I just went through the freezers and pantry and wrote what was in there for next year's edible garden planting adjustments.
14.  My peppers, eggplants and tomato seedlings got a really slow start this summer.  We had a wonderful warm up and then a really chilly period.  I think this chilly weather put the brakes on growth and flowering.  I bought a walk in portable greenhouse this fall that I put my potted peppers and eggplants in to see how long I can extend the season as I do need more sweet peppers for salsa and more Anaheim peppers to dry for chili powder.  I'll use it again in the spring to see if I can jump start all three varieties next summer.  I learned in researching which one to get that clear plastic lets more sunlight in.  I went with a clear plastic since I am using it for the chillier months.

I'm sure there were more learnings that I am forgetting about.  I think I will designate a page at the back of my garden notebook to jot down what I am learning so next year I have a more complete list.  Guess that is 15 things I learned this gardening season!

Sunday, November 12, 2023

What's happenin' in the early November edible garden

Lavender in late fall
Sunday, November 12, 2023

Well, we an early freeze then rec warmth and now back to normal fall weather here in the Midwest.  With the lows last week in the lower 20's. all the unprotected summer veggies got killed.  Does that mean the end of the kitchen garden?  Nope.  There is still much in the garden to enjoy!

The cold season crops have survived the first lower 20's of the year.  Kale, lettuce, onions, mustards, chard, carrots, garlic and many herbs are nice and green.  All cold season crops get sweeter when the mercury dips.  Cold season crops for your edible garden

It is time, if you haven’t done so already, to pull up the old vines and give them to the compost heap.  Only compost those that were free from disease; you don’t want to re-introduce any diseases to your garden next season.  I leave seed heads for the birds to snack on for the winter and will clear them out in the spring.  

If you are gardening in pots, move them up against a wall that gets southern exposure.  This will move your effective climate zone up a full zone.  If they are on stands or coaster, remove from their stand and set them onto the ground.  They will stay much warmer on the ground than suspended off the ground.  Putting the pots into the mulch will help keep them warmer still.  

Now is a fun time of year to experiment in the kitchen with all the fresh herbs that are available.  Parsley, thyme, rosemary, sage, tarragon, bay, lavender, chives, oregano, and dill are all hardy herbs in November.  I have had many Christmas dinners with herbs fresh from the garden.

You can also bring tender perennials like rosemary and bay into the garage or house for the winter.  Other veggies I bring in are my pepper plants, celery, eggplants, citrus trees and tropicals.  I keep them in our unheated, insulated garage or heated basement with a 4' grow lights over them.  

This year, I moved the pepper plants, eggplants and tropicals into my new walk in, portable greenhouse.  I chose clear plastic to maximize the sunlight that gets through since I will primarily be using it during the cold seasons.  I will leave the peppers and eggplants in there for the winter.  When it starts getting down into the teens, I'll move the tropicals to the basement.  Plants just don't do as well under artificial light as they do outside.
Walk in, portable greenhouse
You can also take a look at all the tomatoes you have put up in freezer bags.  If you have more than you know you need, this is the perfect time of year to do some water bath canning.  I go through and any left over from last year, I make into sauce.  Time to make homemade tomato sauce! 

As even more freezing weather comes our way, you can extend the season for lettuce and greens through the winter by using a portable green house or making your own hoop house.  I'll put my potted lettuce, chard, arugula, celery, kale and mustard under my portable greenhouses to keep salads going the entire winter.  Extend the season with protection for plants

The biggest killer of veggies in greenhouses?  Getting too hot!  Make sure you crack open your green house when the temps get above freezing and the sun is shining.  

Saturday, November 11, 2023

Time to make tomato sauce!

Tomato sauce in Weck's canning jars
Saturday, November 11, 2023

November is when I defrost and clean out our freezers to make room for the deer my husband will get for us.  It is also the time that I use the extra frozen tomatoes to make sauce.  Making tomato sauce is an easy way to preserve the extras for winter that can be stored anywhere, in the pantry, kitchen, basement or even under the bed!  All you need are some canning jars, tongs, and a stock pot.

It is a good idea to go through your freezer at a minimum of once/year.  You can record what you have left from last year's harvest to adjust what you plant for the coming season, make sure the freezer is organized with like things together with the oldest up front and remove anything past its prime.  I started using plastic containers that are the width of quart bags so I can stand the frozen bags upright.  This makes the label easy to see, keeps bags from slipping around and dramatically increases how much I can get in the freezer.

I have learned that I need one wire basket of frozen quart bags of tomatoes to keep us in salsa, soups, chili and other uses for tomatoes.  After I fill up the basket with this season's frozen tomatoes. I will can all left from the previous year and any additional from this year.  I'll record how many i left in the freezer, how many were from last season and this season that I am making into sauce as well as how many jars of sauce I can.  From this, I can see what adjustments to make on the number of tomato plants to grow next year.

Tomatoes are considered an acidic vegetable so simple water bath canning is all that is needed to process the sauce for food safety.  Always follow the recipe exactly to ensure the acid level is high enough for water bath canning.  If a recipe calls for pressure canning, also follow it exactly as the time for canning under pressure and acid level of the food is critical for making sure all bacteria is eliminated during the canning process.

I follow Ball's "Complete Book of Home Preserving" for their tomato paste recipe which makes a thick sauce.  Just put 9 cups of fresh, pureed tomatoes in a large pot, 1.5 cups of pureed sweet bell peppers, 2 bay leaves, 1 teaspoon of salt, 1 clove of garlic and simmer about 2.5 hours to concentrate the flavor.  You can simmer more or less to the taste you prefer.  Remove the bay leaf and garlic clove.

I use Weck's brand canning jars and pint sized for canning my sauce as that is the amount I use for soups, chili, and spaghetti sauce.  Weck's jars are pretty and the lids are glass so they can be re-used for a lifetime.  Ball and Mason jars are more readily available in big box stores and easy to can with.  I just like using jars/lids that I don't have to buy more of each year and that are as safe as possible.  Glass is the safest on the market.

Boil the jars, lids and seals as the sauce is close to being done.  Add 3 teaspoons of lemon juice to each pint jar, fill with the hot tomato sauce to within 1/2 inch of top of the jar, and seal the lid.  Make sure that the rims are wiped clean before putting on the lid so you will get a good seal.  Follow the instructions for the type of jar/lid system you are using.  

Place all the filled jars in a large pot, insuring they are fully covered with water.  Bring to a boil and continue boiling for 45 minutes.  Remove the jars from the pot and let cool.  Follow the jar/lid manufacturer's instructions for when and how to test the seal.  Test each seal before storing.  For any that the seal is broken, either put into the refrigerator to use in the next week or so or you can put into quart freezer bags for longer term storage.  Some lid systems require you to wait until completely cool (24 hours later) and the conventional metal lids will make a popping sound when they are sealed usually within 30 minutes of being removed from the pot to cool.

Last time I made sauce, I used 40 quarts of frozen tomatoes, 7 pints of frozen sweet peppers, 30 bay leaves and 15 cloves of garlic.  This gave me 32 pints of canned sauce.  I'll document what I do this year as well.  I grow everything I need for the sauce, except the lemon juice.  You have to use the lemon juice to have confidence that the acid level is high enough for safely canning via water bath versus pressure canning.

This type of canning is called "water bath canning"; no special pressure canner is required.  In general, any crop that is acidic by itself like tomatoes or is preserved using an acidic liquid or solid like vinegar and sugar are good candidates for water bath canning.  Do follow the recipe from a reputable source to guarantee food safety.

Ball's canning books have lots of tips on water bath and pressure canning so it is a great resource to use.  You can also look up their canning tips on-line.

Sunday, November 5, 2023

What to plant in the November edible garden 2023

Portable row cover 

Sunday, November 5, 2023

You can still plant for the edible garden in November.  Plant seeds of cold loving crops.  Many cold season crops have much better germination success when it is cooler.  Even if they don't grow rapidly during fall and winter, they will start growing quickly at the end of January.  For those seeds that don't germinate now, they will come late winter, early spring.  Cover can be used for all the harvestable edibles to extend the harvest all the way through to spring.  
What is a four season garden?
You can garden year round in small space
Planning for a four season garden

This month you can sow more greens, carrots, beets and herbs in the portable greenhouse or under cover.  You can also transplant perennial veggies, fruits, and herbs as well as flowers, trees and shrubs.  Don't forget garlic if you haven't already planted yours, you still have time!   Midwest Perennial Vegetable Garden

Here are the crops you can start in the November Midwest edible garden:

November seeds outdoors
Austrian winter peas
Fava beans
Garlic
Rutabaga
Lettuce-winter hardy varieties
Snow peas
Spring bulbs

November seeds under cover
Arugula
Broccoli and Sprouting Broccoli
Celery
Corn salad
Endive
Escarole
Frisee
Lettuce, Winter Hardy types
Mustard and Mustard Greens
Parsley and Parsley Root
Radicchio
Rutabaga
Scallions
Sorrel
Spinach
Swiss Chard

November transplants
Asparagus
Cabbage, Oxheart
Winter and Perennial Onions
Trees and bushes

Portable greenhouse

Look for cold hardy varieties when planting for winter harvests.  You will be surprised to harvest all through the winter months things like greens, onions, Austrian peas, carrots, and cabbage.  You can also extend the harvest by looking for the same crop with different days to harvest timing so that they mature at different times and those that are advertised as winter hardy.  

 Fall planted crops take longer to come to harvest size than they do in the spring.  Rule of thumb is to add 2 weeks.  It's because the days are getting shorter rather than longer and the temperatures are falling.  Planting in November, some crops may not sprout until spring.  

Covering plants when there is a cold snap in the fall will keep them warmer and growing quicker.  I cover my edibles with the portable greenhouse or row coverings once daily highs are no longer getting into the 50's and night time temperatures are dipping down into the 20's.  If your portable greenhouse or row cover has vents, you can cover crops now with the vents open.  You can use cover to help your crops grow faster and to extend the harvest all the way to next spring.  Extend the season with protection for plants  Homegrown, organic salads in a Midwest winter

Saturday, November 4, 2023

November 2023 Edible Garden Planner

Late November edible garden
Saturday, November 4, 2023

November is the time of year we, and Mother Nature, borrow in for the cold months ahead.  It is also a beautiful time of year with the kaleidoscope of fall foliage colors and crisp, clear days.  Late fall chores should include cleaning up your garden beds, reflecting on the gardening season completed, and preparing your fall and winter edibles for the frosty days ahead.

Garden bed clean up
To prepare your garden for its winter nap, remove gardening debris from your beds.  For any diseased vegetation, be sure to throw these away and not compost.  You don't want to propagate and spread any diseases to other parts of the garden.  A really hot compost pile will kill them but it isn't worth the risk going into winter.  I keep the seed heads on the flowers in the garden for food for the birds over the winter.

Remove stakes, trellises, and tomato cages and store for the winter.  Clean and oil all garden tools.  Clay pots will crack if allowed to hold water when they freeze.  Either empty, cover or bring under cover for the winter to protect from breaking.  Make sure your hoses are drained, your watering cans are emptied, your water barrels are emptied and disconnected from gathering water for the winter and your outdoor faucets are insulated for the winter. 

This is a good time to make sure your compost and composter are ready for cold weather.  Compost provides nutrients, beneficial microbes, fertilizer and overall improves your soil’s condition.  Outdoor compost piles go slowly in the fall and winter, but speed up as temps rise in the spring.  I use a plastic tumbler type composter with 2 bins.  This time of year, I fill up one side with garden waste goodies from tidying the garden and empty the other side of its finished compost so it is ready for the winter adds.  I also cover my tumbler composter with a grill cover when it rains or snows to keep the compost from getting soaked.  If doing compost piles, it is a good idea to cover them for the winter.  Super wet compost will not decompose; compost needs to just be damp.

It is critical to keep the greens and browns in the right ratio to keep the compost cooking in the winter.  You want to add 1 part "browns" to 3 parts "greens" to keep the microbes in balance.  I find that I need to add shredded newspaper to mine in the winter because there aren't many "browns" coming from the garden or kitchen.  This year, we have chickens so I'll use their used bedding for my browns.   Here are some tips if your composter/compost pile starts having issues  Troubleshooting your compost pile

After your garden clean up, look to give your garden a nutritional boost for the winter months.  Doing a nice layer of compost and organic fertilizer, topped with mulch, will allow the nutrients to seep into the garden soil, ready to give your spring plants a boost.  The mulch will keep the soil more temperate during the winter months for your winter edibles and keep weed seeds from sprouting.  Organic fertilizers take a long time to release their nutrients.  Using in the fall will give the spring garden a running start.  It is best to get a soil test done to make sure you are keeping the nutrients in the right balance.  You may need only nitrogen.  If a soil test shows you need to make major changes, fall is the best time to do this to give the soil the winter to equilibrate.  The next step in garden production and your nutrition-soil minerals

Reflection on the past garden season
While the past gardening season is still fresh in your mind, now is a great time to jot down some notes on what went well, what didn’t, and what you would like to research over the winter.  Make a list of the varieties that did great that you want to replant, which plants you want to be sure to have more, or less, of next year.  Also make note of how many plants make sense to plant for next year.  Here are my reflections this fall for the edible garden.  Reflections on the 2023 edible garden and plans for 2024

Keep track of what you eat over the winter to give you a good idea of what and how much to plant come spring.  This year, I am writing down what I have in the pantry and freezer so I can see come spring how much is left to adjust what I plant.  How much to plant?  Use this winter to figure out what to grow in the spring!

Even if you have a small area, you can grow most of what you eat.  How to decide what to plant for small spaces?

Fall is a fabulous time to make new garden beds.  It is super easy, too.  Just use a hose to outline your new bed, fertilize, put down a layer of cardboard (earthworms love cardboard!), a layer of compost, and cover with mulch.  By spring, the new garden bed will be ready for planting.  Easy ways to make a new vegetable garden bed

Gardening after the first frost
For northern Kentucky, the average first frost date is mid-October.  We have already had a few frosts and freezes this October.  When the lows start getting 28 degrees F or below, this is a killing frost for the summer veggies.  Be sure to harvest the remaining tomatoes, peppers, okra, basil, eggplant, cucumbers and squash before your first hard freeze.

Green tomatoes and peppers can be brought indoors to ripen on the counter.  Green peppers are great as they are.  You can let tomatoes turn red or eat as green tomatoes.  I remember my grandmother making fried green tomatoes every fall.  A late fall tradition-fried green tomatoes!  Many make them into relish, too.

One vegetable that surprises me with how long it stays good just sitting on the counter are cucumbers.  I have kept cucumbers through February.  I just found a hidden one in the garden yesterday.  I'll likely make it into dill relish.  Quick tip-make homemade pickle relish

This year, I bought a portable, walk in greenhouse to extend the growing season.  I had potted pepper and eggplants that were loaded with fruits.  I'll keep track of how far into winter they keep producing in the greenhouse.  It was a really slow start this summer for these veggies.  I definitely need more Anaheim peppers for this winter's chili powder!  The greenhouse will let me get an early start in the spring for the summer veggies.

There are many edible crops that can still be planted in November.  You really can eat fresh out of the garden year round, even if you live in Zone 3.  Greens, asparagus, herbs, winter onions, broccoli, rutabaga, fruit bushes and trees and perennial flowers are a few of the crops that can be planted this month.  It is not too late to plant your garlic.  Growth does slow down from end of November to mid January as daylight hours dip below 10 hours.  For more on planting in November,  What to plant in the November edible garden 2022 

I cover my greens with a portable green house to keep salads coming all winter when it calls for the temperatures to dip down around 20.  When I grow other cold season crops like broccoli, cabbage and Brussels sprouts, I use a floating row cover to keep them warmer and improving growth.  For cold climates, using cover is the key.  You can garden year round in small space

I have lettuce starts that are getting to a good size to plant into their winter pots.  When I move my outdoor pots into their sunny spot for the season, I will finish transplanting the lettuce seedlings into them.  It is likely too late to start seed for plants that you can harvest this winter, but it will give a boost for spring harvests.  I use gallon jugs of water inside the portable greenhouse to keep the temperature more moderate, too.

If you have a cold frame or greenhouse, you can sow spinach, lettuce, carrots, beets, cold hardy herbs, kale and mustard this month.

If you are using uncovered pots, putting the pots on the south side, in a sunny local and close to the house will keep them from getting frost bit into November or even December for cold season crops.  It seems to extend the season for 2-4 weeks.  Prepare for hard freeze
Late November potted lettuce
For the herbs you cut back earlier in the season to dry, November is a great time to now strip the stems of the harvested leaves and put into jars for winter cooking.  You can make your own “Herbes De Provence”.  Thyme, oregano, rosemary, savory, basil, tarragon and lavender are common herbs used in this famous French seasoning, but any combination is tasty.  I mix them up in about equal amounts and store in a sealed Mason jar.  It is great to add to just about anything-sauces, chicken, fish, potatoes, garlic bread.  Makes wonderful Christmas presents, too.  Make your own "Herbes de Provence".

For those that keep on going into the winter like thyme, sage, oregano, rosemary, chives and tarragon, I would prune back the plants by about two thirds and strip the leaves from the cut stems.  Do so when there are warm temps forecasted for a few days to allow the plants cut ends to heal.  Otherwise a cold snap can kill the plant.

Use your herbs for your Thanksgiving meal Use your own herbs for your Thanksgiving dinner  More than likely you will have some edibles still growing in the garden.  Take a look and plan your meal around them.  Some winter hardy edibles include kale, broccoli, cabbage, chives, sage, thyme, corn salad, sorrel, cultivated dandelions, plantain greens, celery, mustards, even some hardy lettuces.