Saturday, December 29, 2012

Medicinal teas you can grow yourself


Saturday, December 29, 2012


I did an earlier blog on growing your own teas.  I recently read in Hobby Farm Home about different medicinal herbs for teas.  This is the time of year these may come in really handy.  Here is a list of what they shared.

Burdock-can be used to help with constipation and skin conditions like eczema and psoriasis.
Chamomile-used to reduce inflammation, muscle spasms, and restlessness.  It is well known for its relaxing effect.  Be careful using, though, if you have a ragweed allergy.
Fennel-used for osteoporosis, stomach cramps.
Lavender-for anxiety, insomnia, irritability, restlessness.
Lemon balm-for digestion, nervousness, skin conditions.
Plantain-for coughing, inflammation, insect/animal bites.
Red clover-menopausal symptoms, osteoporosis, skin conditions.
Sage-for digestive problems, menopausal symptoms.
Thyme-for allergies, colds, cuts or scrapes, fungal infections, respiratory infections.

You can place in cheesecloth or a tea ball.  Steep for 4-6 minutes.  

Monday, December 24, 2012

Homemade lip tint


Monday, December 24, 2012

Here is recipe that I got on motherearthliving.com for all natural lip tint you can make yourself.
DIY Lip Tint 
• 1 teaspoon coconut oil
• 1/4 teaspoon beeswax pellets
• 1/4 teaspoon, plus 1/8 teaspoon, beet root juice
• 1/8 teaspoon vegetable glycerin

Melt the coconut oil and beeswax in a double boiler (bowl in a water bath).  When melted, add in the beet juice and glycerin.  When well incorporated, add to a small jar and you have your own homemade lip tint with all natural, or organic, ingredients.

If you want to make your own lip dyes, here is a list I got from hobbyfarmhome.com: 
Red cabbage: pink
Onion skins: orangey-brown to green
Strawberries, cranberries, raspberries and pomegranates: shades of pink and red
Blueberries, blackberries: blue to purple
Mulberries: purple
Turmeric: vivid orange
Cumin: yellow
Paprika: orange to red
Spinach: pale green to light yellow
Cherries (frozen): peach to beige
Barberry (all parts): yellow-orange

Saturday, December 22, 2012

A sweet alternative-grow your own

Baby stevia plant

Sunday, December 22, 2012

Want an all natural, zero calorie, zero glycemic index sweetener?  You can grow your own!  It is an herb called Stevia.  Stevia is 30-45 times sweeter than sugar.

It is from the sunflower family and a native of South America, Central America, and Mexico, with some found as far north as Arizona, New Mexico and Texas.

In our zone 6, stevia will not survive outside during the winter, but can easily be brought indoors for the winter.  I keep mine in the garage and it is happy there.
Potted stevia

You can easily grow from seed or buy at your neighborhood nursery.  Just about any big box store carries this high antioxidant plant.


The trick to using stevia is to use it judiciously; too much will leave a bitter taste.  I bought a cookbook that shares many recipes for using stevia, called “Stevia: Naturally Sweet Recipes for Desserts, Drinks and More.”  Of course, you can always just look up the recipes on line.

It is easy to dry.  Just cut back to about a third its size when it begins to get lanky.  Place the stems loosely in a paper bag in a dry, dark area and allow to dry.  Just remove the leaves and crush to a powder.  Store in any airtight container.

Friday, December 7, 2012

How do you decide what to grow?


Friday, December 7, 2012


Deciding what to grow can be exhilarating and overwhelming.  The varieties are endless, the options infinite.  Where do you begin when you are deciding what to grow for the first time or for the tenth time?

First, grow what you love to eat!  Make a list of your favorite fruits and veggies.  The caution for a new gardener, start small.  From your list of favs, pick your top 5-7 to start with.

I would start with plants that you get from your local nursery for first time gardeners.  Nurseries will get plants that are proven to do well in your area.

If you have made it through your first season and are ready to branch out, I would head to your Farmers Market.  Most farmers are happy to share their knowledge.  

Many veggies that you buy at farmers markets, you can save the seeds to use for your own garden!  Examples-tomatoes, eggplant, zucchini, pumpkins, acorn squash, butternut squash, any pepper, just to name a few.  Be sure they are not hybrid varieties as they will not grow up to be the same as the parent plant.  Most organic farmers prefer open pollinated or heirloom varieties, both of which grow true.

Ask around at work; you may be surprised at the number of people that are backyard, or front yard gardeners.  They may even have seeds they would be happy to share with you so you can get started!

When you start purchasing seed, you can look for seed companies that are located in a similar climate/zone as you are.  Seed companies do trials of all the seeds and plants that they sell and choose the ones that do the best in their trials.  So, if you pick a seed company in your zone, you have a great chance that they will grow well for you.

If you are like we are, space is also a concern (and who wants to till up more than they have to even if you do have the space??).  Key words to look for in varieties to grow-prolific, produces until frost, vigorous.  I know I want to get the most from my effort and my space!

So, if I were to share the easiest to get started with, what would I grow my first season?  I would start with plants and grow lettuce, spinach, cucumber, zucchini, eggplant, tomato, and peppers.  If I loved beets and green beans, I would plant these as seeds.  Beets can be planted all around your eggplant, peppers, and zucchini and are ready to harvest well before the summer lovers are.  I would plant pole beans on a pretty trellis or arbor.  If I liked to cook with onions and use chives, I would get Egyptian walking onions because they are perennials and can be harvested year round.

Hmmm.  I said 5-7 didn’t I?  I just counted and I did pick 7 plants, but then threw in seeds for beets, pole green beans and an onion.  See how hard it is to keep it manageable?

The next question many ask, is how many do I plant?  There is just my husband and I.  For us, I plant 3 Earthboxes with greens, 1  eggplant, 1 zucchini, 1 cucumber, 3 tomatoes (but I can or freeze the extras).  I would plant a small type tomato (like yellow or red pear) and 1 or 2 large tomatoes as they are not as prolific as the smaller ones.  For peppers, it depends on the type you like.  1 hot pepper plant will produce a lot in a pot!  I have found I need 3 sweet pepper plants to get even close to what 1 hot pepper plant will produce.

After your first year, you may decide you are ready to try seeds.  I highly recommend the Aerogarden for seed starting.  For me, I get a 90+% germination rate using this system.  I have found it amazingly effective.

Happy dreaming!

Sunday, December 2, 2012

Organic, natural lawn care


Sunday, December 2, 2012


Have you ever noticed that every time a lawn care company treats your lawn, they post warning signs to not have pets or people on the grass for 24 hours?  That doesn’t sound like something that is good for you or your family.

Chemical fertilizers and weed killers kill the microbes in the dirt as well.  These microbes are extremely important to supporting the plants growing.  They help provide the nutrients your turf needs to be resilient through all seasons.

So, what are the options?  You can go all natural and organic.  It takes 2-3 years for the microbes to rebound and your turf to get the full benefit of going all natural.

The system we like is from Organica.  It is applied 4 times a year.  The cool thing about organic, natural fertilizers is that they do not burn the lawn.  You don’t have to worry about applying too much, like you do with chemical fertilizers.  Don’t be concerned either that the NPK numbers on the bag are lower.  Natural products don’t get washed away like chemical fertilizers so you don’t need the high numbers. 

In late fall and early spring, they have a Lawn Booster that you apply; it is 8-1-1.  It contains corn gluten meal, steamed bone meal, sulfate of potash and natural soil bacteria. It simultaneously promotes turf growth & enhances biological activity in the soil profile.  This is really important-having microbes in the fertilizer to repopulate your lawn.  It also contains corn gluten.  This is a pre-emergent weed killer.  For the spring application, apply when the forsythia bushes start to bloom.

Late spring and summer, they have a Kelp Booster Plus.  Kelp Booster has plant growth hormones to give plants added resilience. It provides essential nutrients to promote cell division, root development and growth. 

They used to have 4 different types so if you see these, they are great to use as well.

You will have a lush, green lawn in 2-3 years using this system.  You won’t have the thatch that you see in chemical yards either.  Make sure that you are reseeding to keep the carpet thick to crowd out weeds.  

I would say this is the hardest part of organic-the weeds.  Options are using vinegar on hot days on the weeds, using a propane burn torch, or good, old fashioned pulling.  If you do resort to chemicals for weeds, try to spray as local as possible and do so close to when you are going to apply your next round of fertilizer to help with repopulate the microbes the chemicals killed.

A natural, organic lawn needs much less watering than a chemical lawn and stays green almost all summer with no watering.  This past summer was an exception with the high heat and drought we had.  It has now fully recovered and looks great.

Tuesday, October 23, 2012

Winter squash harvest time


Acorn squash in window, toughening skin for winter storage


Tuesday, October 23, 2012


Winter squash, this includes pumpkins, are ready to harvest after the vine completely dies.  Be sure to harvest before it gets too cold.  A frost or two is the max cold to leave them out in.

You should be able to poke the squash with your fingernail and it should just dent it, not puncture the skin.  Leave 2-4” of stem attached when you harvest.  Place in a warm, sunny place to allow the skin to toughen.  Then, store in a cool, dark location until ready to eat.

Depending on the variety of winter squash, it can store well for months.   Butternut and spaghetti squash are long lasting common winter squash.   I ate our last butternut in June this year! 

Friday, October 12, 2012

It is garlic planting time!


Friday, October 12, 2012

October is the month to plant garlic in our Zone 6 garden.  You plant in the fall to give the cloves time to develop a strong root system over the fall and winter.  You will get significantly bigger bulbs next summer.

Garlic loves rich, loose soil.  Raised beds with lots of compost is their dream home.  If growing a garden bed, loosen the soil and mix in generous amounts of compost and top with mulch.

You can plant in the spring and you will get garlic, but just smaller.  Garlic scapes, on hard neck garlic, are tasty adds to spring salads.  The scapes themselves are worth planting garlic for!

This year I am planting Elephant garlic (saved from this summer’s crop) and Turkish Giant.  I go for the big cloves as they are quicker to prepare.  For whatever type you plant, always choose the biggest and best cloves to plant!  The best gives the best.
A trick to preparing garlic.  Take your knife and using the flat side, squish the garlic clove.  This breaks the “skin” making it easy to remove.
Use the flat side of your knife to smash the garlic clove, breaking open the skin

If you had garlic in the garden this summer, don’t be surprised to see volunteers poking their heads out come spring.  A nice present.


Saturday, September 29, 2012

Get set up for harvesting all winter!


Saturday, September 29, 2012

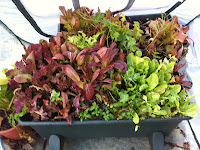
Portable greenhouse

The chill is in the air.  The lettuce and other cold season crops are loving the cool temperatures and showers we are getting this wonderful time of year.

Last winter, I was able to harvest through the entire winter season.  I used a portable, plastic green house.  It is about a 3 by 3 by 3 feet and held 3 Earthboxes and 3 pots.  I have also used it directly in the garden bed and it worked equally well.
Greenhouse in January
I placed gallon milk jugs, painted black, and filled with water in each corner of the greenhouse.  The milk jugs absorb the heat during the day and release it back in the green house at night, moderating the temperature.

You can buy portable greenhouses in all sizes.  Be careful of tall greenhouses; it is difficult to keep the whole space warm without electrical warming.  You can add a simple lightbulb or a blanket heater on the floor if you want to use a tall greenhouse.

The biggest risk for using a green house is it getting too hot!  When it is a clear, sunny day, it can get quite steamy quickly.  For days getting warm, you need to allow for some venting.  Open the zipper more for really warm days and for freezing days with no sun, keep it zipped up tight.

You can also use individual covers on plants as well to extend the harvest.  Since you can’t put in additional mass (you can try black rocks or a brick), they likely will not get you through the entire winter.

You can bring many of your potted herbs indoors, on a protected porch or even in a garage with windows.

Don’t forget sprouts for fresh veggies all winter long grown indoors!


Sunday, September 23, 2012

What to do when frost is forecasted


Sunday, September 23, 2012

With frost in the air, summer loving veggies are coming to the end of their season.  Veggies like tomatoes, eggplant, zucchini, cucumber, basil, and peppers do not like cold weather.

Basil turns black when bitten with the first frost.  I harvested all remaining basil today.  Had about 12 cups or so of leaves.  I added about a cup of olive oil in the food processor.  Once combined, I put in a freezer bag.  Now, I can just break off a piece anytime I want fresh basil flavor in a recipe.

Our zucchini has given up.  We keep getting male flowers but no females so no fruits in the last 3 weeks.

Still have cucumbers coming slowly.

The peppers are still going strong.  They handle cooler weather better than basil.  I’ll wait until it is going to get down to 32 before I strip off all the peppers still on the plant.

I use the same approach for tomatoes.  When it is going to get down to 32, I’ll take off all tomatoes left on the vine.  The best way to get them to ripen is to wrap each individually in newspaper and store in a dark location.  They will slowly ripen.  Won’t be as tasty as off the vine, but better than what you can get in the store.

Now is also a great time to divide any perennials you have, whether they be herbs, edibles or ornamentals.  This will give them all fall and winter to put down strong roots.  Perennial greens are always the first up in the spring.

It is still not too late to transplant fall crops like cold hardy types of lettuce, cabbage, chard, pak choi, broccoli, kale, parsley or perennial herbs.  I found 6 and 9 packs at Home Depot and Lowes.

Now is the time to order your mini greenhouse to extend the season.  I’ll put mine out over the greens in my Earthboxes sometime next month.

Sunday, September 16, 2012

September is a month peppers love


Sunday, September 16, 2012

Jalapeño

My peppers kick into high gear come September.  They seem to love the lower humidity and cooler nights.  

Peppers like sulfur, calcium (to protect from blossom end rot), magnesium (helps flowers make fruits), sulfur (makes more nutritious pepper) and phosphorous (for flowering).

Be careful with the nitrogen.  Nitrogen promotes greenery.  You will end up with beautiful, lush plants with no flowers or fruits.  Also be careful in the type of potting soil you buy if planting in pots to make sure they are not for green leaved plants, but for flowers or vegetables.

Right now, I have poblano anaheim peppers, several different colored sweet bell peppers, negro pasilla bajio/mole peppers, and jalapeños.

The poblano I am drying for chili powder.  The sweet peppers I rough slice and freeze for salsa, The pimentos, I chop and freeze for salad.  The negro and jalapeños, I remove the tops and freeze hole.  The negro pepper I am going to try out this winter in mole sauces.  The jalapeños I use for salsa and some I don’t freeze, but put in apple cider vinegar to ferment for hot sauce for wings for football games.
Green pepper 
Poblano
Yum!  Yum!

A friend shared with me recently that he thought he was going to give up trying to grow vegetables because all he got was pretty plants with no fruits.  He was growing them in pots.  

My suggestion-don’t give up!  Since you are doing a great job with greenery, go for vegetables that are leafy, like lettuce, broccoli, cabbage, herbs, chard, and other greens.  Now is a great time to replant with these type of plants.

Friday, September 14, 2012

What I planted for fall/winter


Friday, September 14, 2012
Salad burnet, a perennial green


For our fall and winter garden, I went with kale, cabbage, mustard greens, lettuce, spinach and Patience dock.

I planted a few varieties of kale-Winter born which is extremely cold hardy, scarlet kale which is a beautiful maroon, Tuscan or dinosaur kale which has a great texture, dark color, and is very tasty and Sea Kale, a perennial blue green kale that is tasty when small leaved in salads and a nutty cabbage flavor when steamed or sautéed.

For cabbage, I planted Northern lights ornamental cabbage (green with either white, maroon, or pink centers) and Savoy which is kind of a combo between a loose leaf cabbage and the traditional cabbage.

In the lettuce category I planted two butterheads-Speckles and North Pole, two romaines-Winter Density and Rouge d’Hiver, a loose leaf-Winterwunder.

To round out the greens, I planted Ruby Streaks mustard which has lacy red leaves, Space hybrid spinach, and Patience dock a long-lived, deep rotted perennial.  It has a similar flavor to spinach and can become a nuisance if you don’t remove the seed stalks that appear in mid-summer.

I love adding as many perennial greens as possible.  They are typically the first to come up in spring and the last to go in winter.  Perennial greens tend to be sweetest in cool weather.

Other perennial greens growing in our garden-chard, French sorrel, blood-veined sorrel, corn salad, salad burnet, purslane, peppery arugula, chives, Egyptian walking onions, dandelions, celery.

Saturday, September 8, 2012

Powdery mildew


Saturday, September 8, 2012


You can tell it is late summer by the emergence of powdery mildew and other fungal diseases on your veggies and some flowers like roses and peonies.

Powdery mildew loves squash!  It shows up during hot and high humidity conditions.  It can also be encouraged by overhead watering.  The best watering method is some type of slow drip at the roots of your veggies.  This gets the most actually in the ground to the plant and minimizes evaporation (reducing your water bill).

Overhead watering, besides encouraging mildew and other fungal diseases, can also remove the insects that pollinate the veggie flowers and even the pollen itself, leading to low harvests.

Powdery mildew can be treated by spraying the top and underneath of all leaves with a baking soda solution, copper or fresh whey.  An easy to make, low cost spray is as follows:  2 tbl of baking soda, 1/2 teas of gentle dish soap, 1 gallon of water.  Wet top and bottom of leaves thoroughly.  Reapply after a rain.

You can also purchase organic mildew sprays, like Safer.

Be careful in using sprays; they may be too harsh for some vegetable plants.  Test them on a small area of your plant, wait for a day before spraying the whole plant.  Copper based sprays work great on my peonies, but not so well on my squash.

Many recommend if you cannot get rid of the mildew with a spray, you should remove any diseased leaves and throw away.  Do not compost because if you do not get internal temps in your compost at 140 or greater, it will not kill the spores.

A boost of potassium is good this time of year for your veggies.  Nitrogen supports the greenery of your plants while potassium supports the blooms.  Keeping your plants well fed helps them stay healthy and producing well into fall.

I also heard that using your excess whey to water your tomatoes really boosts their growth.  I am going to try it this week when I make my next batch of cheese.  I’ll let you know how well it works.


Sunday, September 2, 2012

Harvest and preserve your herbs


Sunday, September 2, 2012
Multicolor sage
Thyme

Oregano
End of summer is a great time to tidy garden beds and harvest herbs.  Herbs have a tendency to take a walk on the wild side.  As the days get shorter, growth slows and before long the sun cannot support all the greenery from summer.

This is the perfect time to harvest your herbs.  You can cut them back so they remain lush, improving the tidiness of your garden, and providing herbs for the winter ahead.


When you harvest your herbs, you will have enough for at least 5 families! They make wonderful gifts. 

For soft herbs like chives and garlic chives, I cut around the outside.  You can either then dry or freeze your cuttings.  

Rosemary
For rosemary, I trim back as I would a tree, cutting off he lower limbs.  I have not been successful in finding a rosemary that survives outside in my Zone 6 region.  Before winter, I will harvest all the limbs so I don't waste any of that great flavor.  Rosemary is perfect with lamb, on potatoes, or on cheese bread.

For sage, savory, and thyme, I simply trim them into a pleasing, healthy shape.  For basil, oregano and marjoram, I remove about half of the top growth.  Basil also will not survive even a frost.  So when they call for frost, I harvest all that is left on the plant.

I dry my herbs to preserve them.  I put loosely in a paper bag in a dry, warm area out of the sun and let dry naturally.  Loose is the key here so they get good air circulation and do not mold.  They should be completely dry in about 3-4 weeks.  I like putting them in clothes closets to dry as they release such great fragrance.

Once dried, remove the leaves from woody herbs and store in an airtight container out of direct sunlight.  If a soft herb like chives, you can just crumble into the airtight container.  I use wide mouth canning jars for herb storage.

If the winter is not a bad one, most perennial herbs like chives, oregano, sage, savory, and thyme can be harvested year round straight from the garden.

Saturday, August 25, 2012

August is prime time for planting for fall and winter gardening


Saturday, August 25, 2012
Cool season greens

August is prime time for getting the seeds and plants in for fall and winter gardening.  You can grow everything in fall as you did for spring.  Think fresh, crisp lettuce, broccoli, cabbage, peas, carrots, spinach, leeks, cauliflower, turnips, onions, cilantro, radish, tat-soi, fava beans, escarole, frisee, fennel, parsley, mustard, kale.  

For the courageous, you can also try bush beans or cucumbers.  There are varieties that mature in 50 days.  Those you better get in quick though to be able to harvest much before frost moves in.

One thing to keep in mind is how long you want to be able to harvest from your garden.  The change I make from spring to fall plantings is in the spring, I plant those varieties that are heat tolerant.  In the fall, I plant those varieties that are cold tolerant to extend the harvest as long as possible into winter.  Depending on the severity of the winter, many cold tolerant varieties revive in the spring and provide a really early, nice harvest surprise.

In order to know when to plant, take the harvest time on the package, add 2 weeks to it, and back up from your first frost date.  You add a couple of weeks because in the cool weather and shortening days, plants don’t grow as fast.  You also want a little buffer in case frost comes early.

You can wait a little longer before planting if you buy bedding plants.  These are hard to come by in most areas, but as more people are gardening, it is worth a phone call to see.  In snooping around on internet seed companies, Burpee’s did have some fall bedding plants for sale (cabbage, kale, cauliflower and broccoli).  

I like to do seeds in my Earthboxes as a pot is easy for me to keep moist for the seeds to sprout.  They have a built in water reservoir.  After the seedlings come up and have some good growth, I will transplant elsewhere.  

Just like in spring, seeds have to be kept moist to sprout.  You can also plant the seeds in peat pots or you can reuse the plastic annual trays you got in the spring.  You can put the plastic trays in a water catch pan, find a shady spot convenient to watering, fill with seed starting mix, sow your seeds and keep moist.  When the seedlings get their true leaves on them (second set), they are ready to transplant into the garden or a larger pot.

Lettuce varieties that have performed well into winter for us here in Zone 6: North Pole butterhead, Rouge d’Hiver romaine (pretty red and green), Winter Density romaine, Winterwunder loose leaf (pale green), Marvel of the Four Seasons butterhead (green with cranberry tips).  I will also plant Prizeleaf, green and red Royal Oak leaf, Red Salad Bowl, and Ashley mix loose leaf varieties as all of these came back as volunteers in the spring.

We have used a portable plastic green house that is about 3’ wide, high and deep for the last couple of years.  I have tried them over a garden bed and over our Earthbox pots.  Both worked well and have had celery, lettuce, chard and mustard all through winter.


Fall is also a great time to plant perennial greens and vegetables.  They are typically the first up in the spring.  Things like salad burnet, French sorrel, arugula, radicchio, chives, chard, fennel, rhubarb, asparagus, French dandelion.  

Late fall is also garlic planting season.  Make sure you get the garlic ordered you want as many are sold out early.  I ordered Turkish Giant garlic this year.  I am all about maximizing the amount of food I get per square foot.  I will add this one to my Elephant garlic plantings.

Saturday, August 18, 2012

Harvesting basil for seasoning & pesto


Saturday, August 18, 2012


Basil before harvesting
For basil harvest, the key is to harvest before the basil gets too woody.  Mid-summer is typically a good time.  Cut each stem back to the last 4 leaves.   Don't worry that the leaves you expose are not as green as the top growth.  This is natural since they have not gotten as much sun as the leaves on the outside.  Give each plant a good dose and fish emulsion to support quick leaf regrowth.

You can freeze, dry or make basil into pesto.  For freezing, you can freeze into ice cubes to be able to pop into sauces.  If you want to be able to use individual leaves, remove the leaves from the stem, lay on a cookie sheet, put in the freezer, when completely frozen, place the frozen leaves into freezer bags.  
Basil after harvesting

For drying, I place the cut stems into a paper bag that I put in a dry, warm place.  Be sure to leave lots of open space between stems to discourage any mold.  When completely dry, I remove the leaves and place in canning jars.

Pesto is a mixture of fresh basil, traditionally pine nuts (but I use any kind of nut I have on hand-walnuts, pecans, sunflower seeds, cashews), parmesan cheese, a few cloves of garlic, and olive oil.  You can add spinach or parsley.  Just throw them all together in a food processor and ta-da pesto!

I use about 8 cups of packed leaves (be sure to not include any tough stems), 1/2 cup nuts, 1 and 1/2 cups of olive oil, 1 and 1/2 cups of Parmesan, 8 cloves of fresh garlic.  After processing, I put half each in a quart freezer bag, lay flat in the freezer until ready to use.  Just thaw and toss with your favorite pasta or add to pizza, bruschetta, sauce for a quick and tasty meal.  Lots of options!


Saturday, August 11, 2012

What’s growing in the August garden?

Zucchini, cucumber, sweet peppers, pimento pepper, jalapeno peppers, and pear tomatoes

Saturday, August 11, 2012

August sees the full swing of the summer, warm season garden harvests.  Late sweet corn (plant corn in succession and different varieties to lengthen the harvest), summer squashes (like zucchini), peppers of all types (sweet to hot, hot), tomatoes, Mediterranean herbs, cucumbers, okra, apples, peaches, pears, grapes, beans, melons, figs, eggplant, honey, artichokes, blackberries, blueberries, raspberries, onion, and fennel are all in season in the Midwest.  

If you are not growing these in your own garden, your local farmers market is a great place to pick up these seasonal veggies to either eat or preserve.  The best buy on any fruit or vegetable is when it is in season.  You can get even better deals on any produce that has a few blemishes which have no effect on the flavor.  If you are going to can, freeze or dry them, just be sure to remove any blemishes first.

I pick what to have in our garden based on the harvest per foot of garden space needed.  Our garden is incorporated into the flower garden mulch bed and in pots so we have to be choiceful on what to grow.

In pots, we have had great luck with  Egyptian walking onions (which can be harvested year round), peppers, eggplant, zucchini, cucumber, greens, fig, columnar apple, passion flower, sweet bay, and celery.

I put the sweet peppers in the ground this year to see if we got a better crop that way.  It has been mixed, 2 of the 6 plants in the ground are producing very well and the other 4 have hardly any fruits.  

I also put a jalapeño pepper plant in the ground this year.  It did much better in the pot.  The plant and fruits are significantly smaller than in the pot.

The zucchini is doing well in the ground this year.  It did well in the pot last year.  You just have to be sure you get a variety intended to be grown in a pot for it to fare well.

I have tried tomatoes in pots in previous years and just did not have good luck.  If you get a variety such as Tiny Tim, put it in a roomy pot, and water with a liquid fertilizer daily, you will get good results.  I am just not willing to invest the time to keep it in a pot.  Weekly care for plants in the ground is sufficient.  A pot with a water reservoir in the bottom is the best solution for lengthening the time between waterings when growing in pots.

I grow all of our herbs in the ground except sweet bay.  Sweet bay is a tender perennial and will not survive winters outside so I keep it in a pot to bring in each fall.  

Rosemary is also tender.  I have tried the two varieties that are supposed to be able to survive a Midwest winter, but have not had any luck yet.  I have tried to also keep in a pot and bring in each winter, but have not had good luck with this approach either.  So, this is an herb I buy each spring, plant in the garden, then preserve for the winter by harvesting late in the season and drying.

A quick reminder, save the seeds from your best performers to plant next year.  You can replant seeds from any heirlooms or open pollinated plants.  Not only does it save you money, but it also gives you the plants that do the best under your garden and zone conditions.

Sunday, July 29, 2012

What to do with all those tomatoes??


Friday, July 27, 2012


It is peak tomato season!  There are so many recipes that fresh tomatoes can be used in-salsa, salads, bruschetta, cucumber/tomato/onion salad, on burgers, on sandwiches, on pasta, the list goes on.

Whole, small tomatoes, ready for freezer
Dried tomatoes
So, what to do when you are eating tomatoes at every meal and still have them coming?  It is time to preserve them.

I freeze, dry and can my excess tomatoes.  
Be sure to put the date and description on each freezer bag and quart jar.  Use the oldest first and all within a year.


During peak season for any produce, you can get the lowest prices at your neighborhood farm or farmers market.  In many cases you can get a huge discount for any bruised or blemished tomatoes.  These are great to use for preserving, just be sure to remove any soft spots.


Right now, I prefer to freeze them because it is so hot that I don’t want to turn on any heat generators inside the house.  For cherry type tomatoes, I just throw them in a quart freezer bag and put in the freezer.  For larger tomatoes, I slice then put them in freezer bags.  They thaw much quicker this way.  They will have a fresh taste when thawed and used for salsa, sauces, or chili.  
Freshly canned tomato sauce
When it cools, I start drying and canning.  I just love “sun dried” tomatoes right out of my own dehydrator.  You store your dried tomatoes in a quart jar to use until next year.  Only a water bath is needed for canning tomatoes because they are acidic.  Make sure you follow a sauce recipe exactly as it is critical for keeping to the right acid level.