Saturday, January 23, 2016

Reasons to grow your own veggies and herbs


Saturday, January 23, 2016

I have fond memories of long summer days at my Granny’s. She had a BIG garden. My sister and I were always Granny’s little helpers. Of course, she was also a wonderful cook. 

Every gardener has their own story on how or why they got started gardening:
-Growing your own was how your Mom and Dad did it.
-Wanting the freshest produce that gives your family the most nutrients.
-Little Joey or Angel is a picky eater; if the little one helps plant it and grow it, they will want to eat it.
-Knowing that what you feed your family has no chemicals in it and contains no genetically modified organisms (gmo’s).
-Enjoying the variety of what is in season.
-Keeping Grandma or Grandpa’s favorites alive from seeds that have been passed down for generations.
-Just love watching things grow and digging in the dirt (it is great exercise to boot).
-Ability to snip the freshest herbs to add to your latest culinary masterpiece.
The list goes on........

I migrated from flowers to herbs and most recently to veggies. I love fragrance and ran across a clearance herb book. It listed many herbs that could be grown indoors. I thought that would be a great idea to grow good smelling herbs to freshen the house over the winter. When spring came, I transplanted them outdoors. Start a kitchen herb garden!

I toyed with adding veggies, but wasn’t sure how that would work out, living on a golf course! I decided to try it out, incorporating them into my flower bed. Our concerns were diminished when the golfers began complementing us on our “flowers.” It is amazing how much you can grow in very little space and how great it can look.

There are so many new varieties that come out every year for small spaces.  These are referred to as patio, compact, or dwarf types.  Burpee’s seed packets this year display a terra cotta pot with a check mark in it for those that are good for growing in pots, which will also work great in small spaces.  Veggies for small spaces  and Fruit for small spaces

Intersperse your vegetables and herbs with your flowers.  Not only does it look beautiful, but the flowers attract the pollinators that increase the amount your vegetables produce.  I plant my peppers with petunias in pots that we use on the patio and line the border of my vegetable garden with day lilies and marigolds.

You can grow healthy plants without chemicals, referred to as all natural or organic gardening practices.  Your plants need beneficial insects to pollinate your fruiting plants (like tomatoes, zucchini, cucumbers).  Insecticides don’t know the difference between a good bug and a bad bug.  There are organically approved insecticides that can be used, but should only be sprayed cautiously.

Herbs are so easy to grow.  Many of our favorites (oregano, rosemary, thyme, savory, basil, chives) are from the Mediterranean region that has little rainfall and poor soil.  You actually get the most flavor from herbs that are kept on the dry side; it concentrates the oils in the leaves.  You can harvest from them nearly year round as they are also perennials.

I named my gardening blog after the gardens our grandparents and great grandparents started to help support the World War II effort, called “Victory Gardens.”

Whatever is your reason for thinking about growing a garden, right now is a great time to plan what you are going to grow this spring!  How to know what to grow

Monday, January 18, 2016

Natural air fresheners you can make


Monday, January 18, 2015


Most of the air fresheners on the market today contain artificial chemicals, volatile organic compounds.  Anything that is listed as “fragrance” as an ingredient, companies that make them are exempt from sharing exactly what is in that fragrance, even in cosmetics.

Studies have shown that air fresheners can contain acetone (what paint thinner is made of), acetaldehyde, chloromethane, and 1, 4-dioxane along with 20 more different VOC’s.  7 of these are regulated as toxic or hazardous under federal laws.

If you want to stay away from products that contain VOC’s, there are limited options today, but there are options.  You need to look for air fresheners that contain only essential oils.  Or you can make your own!
A simple diffuser is easy to make.  You need only grape seed oil (half cup), your favorite essential oil (5-10 drops), some wooden skewers, and a small bottle to put it in.  
You can also just add essential oil to your favorite potpourri to refreshen the scent.  Some of my favorites are eucalyptus, rose geranium, clove oil, jasmine, patchouly.
Different scents evoke different emotional responses.  For calming properties-chamomile, juniper, lavender, lemon balm, rose, ylang ylang.  Energizes-eucalyptus, grapefruit, lime, mint.  Memory-sage and rosemary.
If you want to purchase plug in fresheners, Aura Cacia is one the uses essential oils and you can get it on amazon.com.  Or you can purchase a scent ball that lets you add your own scent.  This gives a strong scent, but it needs to be refreshed often.
To get rid of odors in rooms, you can put out bowls of vinegar.  It will stink initially, but will get rid of odors in the room.
To get rid of odors in carpets, baking soda is a natural odor neutralizer.  Just sprinkle on the carpet, sweep in, leave overnight, and vacuum up in the morning.  The baking soda will take all the odors with it.  You can add your favorite essential oil(s) to the baking soda before using on the carpet.
I make up a spray of geranium, eucalyptus and lavender essential oil in water.  I spritz in my drawers, linens, and curtains.  Makes everything smell great!
Another option is to take your favorite essential oils or spices and put them water and heat in a small electric warmer or on the stove in a pot. 
For my car, I bought car scent diffuser.  I use clove oil in the car; it lasts a long time.  The one I have does not plug in-you just add the scent to the diffuser pad, but you have that option as well.
There are many different options to add healthy, natural, safe scent in your home or your automobile.

Saturday, January 16, 2016

Easy kitchen garden

Potted veggies with flowers in foreground, herb and veggie garden in flower bed in background
Saturday, January 16, 2016

You can start a garden at any time in spring, summer or fall.  
You may be wondering how to get started..........  

Step 1-I think the best way is to make a list of what you like to eat, then see which of your favorites are best to start in your garden in which season.  There is no time like the present to get moving on your gardening dreams.  For an overview of plants by season, Planning for a four season garden  If you want to start with the easiest plants to grow, do what I did and start a kitchen herb garden.  Herbs thrive under neglect.  Start a kitchen herb garden!

The biggest mistake beginners make is starting too big.  For your first garden, herbs and 5-7  of your favorite veggies are plenty to get your feet wet.  How do you decide what to grow?

Step 2-Now that you have your list, take a look at your garden, patio, deck, porch, front yard to see how much space you have that gets 6 hours of sun a day.  There are so many dwarf varieties of every kind of vegetable to grow in pots or small spaces that you should not be put off thinking you don’t have enough space!  Plus growing compact varieties significantly lessens the work by using less space that you have to care for.  A real win-win.

Step 3-Buy your supplies for your garden bed or pot.  Pots are easy-just buy some organic potting soil and the decorative pot.  Most potting soils come with fertilizer already mixed in.   You do not want to use garden soil as it is too dense for pots.  Make sure you buy the right size pot for the vegetable you are growing.  For the size of pot needed by veggie type, check out this blog  Decorative container gardening for edibles
Potted veggies and fruit trees with flowers on patio

If you are going to plant in your garden bed, your mulched flower bed is a great choice to add veggies, too!  If planting in your flower bed or garden, the best thing to do is a soil test (you can buy a kit or take it to your local co-op extension office).  If this just seems too much trouble, buy an organic balanced fertilizer and compost.  Pull back your existing mulch, apply a 2” thick layer of compost, top with the fertilizer (following the label’s directions) and you are ready to plant. 

For more on preparing your garden bed for planting, Weed free, self fertilizing, till free garden beds for a deep dive or for a quick overview Easy ways to make a new vegetable garden bed

Step 4-Buy your plants.  I prefer to buy plants that are raised without chemicals so I look for an organic nursery to see if they have what I want.  Your local farmers market usually has plants for sell, too, in the spring and early summer.  My next stop is my local nursery or big box hardware store.  Choose the plants that are green and look sturdy.  If they already have blooms, be sure to remove them.  You want all the energy of your plants going into good roots initially.

Step 5-Plant!  Water each plant well before planting.  The best time to plant is before a rain or cloudy days.  Gives the plants a little time to get their roots jump started.

For potted veggie or herbs, fill the pot with organic potting soil, water to get the potting soil settled, plant the veggie, and water again.  You can top with mulch to keep lengthen the time between waterings.  I also plant flowers in my pots to add color and attract beneficial insects.

I like to put a handful of worm castings into each hole with the new plant.  Worm castings have lots of beneficial microbes in them that helps the plants absorb nutrients from the soil.

Step 6-Monitor and water.  Keep an eye on your plants.  They may look sad the first week if it is really hot when they first go into the ground.  Consistent water is the key for success.  Like a lawn or flowers, the best time to water is in the mornings.  When you water your flowers, water your veggies and herbs.  Remember, the biggest cause of plant death is overwatering.  If the soil is moist a couple of inches down, your plants are fine.  I usually don't start watering in our Zone 6/7 garden until sometime in later June.   You may need to start watering pots sooner.

One watch out on watering, many summer crops are susceptible to leaf fungus, like cucumbers, zucchini, squash, and tomatoes.  Be sure to water at the base of the plant and not the leaves.

Saturday, January 9, 2016

9 tips for a healthy, low-tox lifestyle


Saturday, January 9, 2015

 Want to reduce the load of toxins in and on your body?  Here are 8 ways to do it.
  1. Eat organic, whole foods, heavy in vegetables.  Only those foods labelled as organic do not contain pesticides and herbicides.  Natural is not a regulated term.  Find local farmers that do not use chemicals and buy from them; be sure to visit their farm and ask the right questions.  Grow your own-seeds are fairly inexpensive, especially if you get several friends to buy packets and split it between you. You can save seeds from one year to the next if you purchase heirlooms or open pollinated varieties. 
    2.  Eliminate processed foods, refined sugar and carbs.  Sugar is toxic to the body and cancer loves it.  Carbs cause spikes in blood sugar.  Read labels.
    3.  Keep alcohol to a minimum and eliminate smoking.  Alcohol stresses the liver which is what purifies the blood.  You want your liver working in top form.  Dr. Gerson felt that a healthy liver is what heals the body and removes cancer.
    4.  Limit meds and supplements.  Talk to a naturopathic or holistic practitioner or doctor.  Get a test done that shows what you are actually deficient in so you know what you should be supplementing.  Many times just a change in diet can eliminate the need for meds.  We had a NutrEval test done that tells you the vitamins and minerals your body really needs, or doesn’t.
    5.  Don’t forget the exercise routine and keep a healthy weight.  Many studies have shown walking at least 3 times a week for 30 minutes does wonders.  There are also 10 minute workouts you can do in your living room that have shown to be very beneficial as well.  And there are free apps for it!
    6.  Use body products and household products that have all natural ingredients in them.  That nice fragrance may actually be a VOC if it is chemically based.  I heard once that you do not want to put anything on your body that you would not eat.  Your skin is the biggest organ of the body and absorbs right into your blood stream what you put on it.  I think this is a great way to think of it.
    7.  Take your shoes off when you come home.  Keeps the chemicals from the garage, pesticides and herbicides from the grass, and whatever else you have walked on that day, out of the house.
    8.  Use a water filter to keep the chemicals out of the water you drink.  If you use a water softener, you are washing in and drinking a low level salt solution.  Dr. Gerson found that salt causes migraines in some people and is not healthy for your cells.  If you can’t give up your water softener, you can use potassium chloride in place of salt.  This can cause issues with your softener system so consult your dealer before making the switch.  There are also filters like Aquasana's Rhino that can be used in place of a water softener.
    9.  Many recommend supporting your liver with an 80% standardized concentration of milk thistle supplement for a period of time.  Consult a medical professional before using.
You may not be able to do 100% of all of the above, but every bit you do will reduce the toxin load on your body.  It is amazing how different you feel and look when you follow a low toxin lifestyle and diet!

If you have children, their little bodies are much more sensitive to all these chemicals, give them a safe and healthy start in life.

Here is a link to her article for more details:

Sunday, January 3, 2016

January Garden Planner


Sunday, January 3, 2015

January is the time of dreaming and planning for your spring garden.  All the seed companies begin sending out their catalogs for seeds and plants this month.   It is an exciting time for browsing the magazines and making the garden plan for the upcoming year!

Grow what you love!
If you have ever wanted to plant an Italian or French kitchen garden, but weren’t sure if you had the space, you may be surprised.  You can grow the staples of an Italian kitchen garden in as little as 6’ x 6’ space. 

To entice the little ones, an Italian garden can also be called a "Pizza or Spaghetti Garden"!  Pizza garden for the kids

It is common for Italians and French to have a small kitchen garden where they grow herbs, greens and vegetables year round.  It is amazing the amount of food you can grow in a very small space!

If you have only a 6’ x 6’ space, a kitchen garden could include the following:
Herbs (1 each)-thyme, rosemary, sage, oregano, and flat leaf parsley
3 basil plants (for pesto and seasoning)
2 tomatoes-1 small fruiting and 1 slicer type 
2 sweet pepper plants
1 zucchini (look for “bush” types as they are more compact)
1 eggplant
8 red bunching onions
8 garlic plants
Arugula, spinach and lettuce scatter sowed

If you also have room for pots on the patio, you could grow the zucchini, eggplant, and cucumber in pots  (only 1 plant in each pot) and add 3 bush or 6 pole bean plants in the garden bed.  Traditional bush beans would be lentils, Romano, Capitano, Cannellini, fava; pole beans-Roma, Helda, Supermarconi.  Personally, I would stick with the beans you eat whole as shelled beans you do not get as much food per plant, and less food per space in the garden.

If you have more room, you can add almonds (yes, they survive Midwest winters), beets, chard, fennel, chickpeas, figs (grows well in a pot), asparagus, cardoon, chicories, radicchio, endives, broccoli, cauliflower, or annual artichokes.

For more on what to grow in a French garden, Small space French kitchen garden.  For an Italian Sicilian garden, Heirloom Sicilian kitchen garden  Steps on putting in a garden bed, Easy ways to make a new vegetable garden bed  

Friday, January 1, 2016

Composting is possible in small spaces or even indoors

Traditional compost pile
Friday, January 1, 2016

Composting makes what veteran gardeners call “black gold.”  Compost is alive with microscopic critters that help plant roots take in nutrients while also providing them.

You hear over and over again that the key to healthy, productive plants is great soil.  If you are using pots, you can replace your potting soil each year to keep your soil in prime condition.  Another option is to mix your old soil 50/50 with either your homemade compost or store bought compost.  

You can increase organic matter in your garden beds by adding a thick layer of compost 1/2 inch to 3 inches thick in the early spring.  This is also the best time to fertilize.  Apply your fertilizer first, then add the layer of compost.  This insures the maximum absorption of nutrients without getting washed off.  Top the whole thing off with mulch. 

Mulch is organic matter, too.  It will break down and enrich the soil year after year, increasing the depth of dark, rich soil over time.

A side dressing of compost monthly during the growing season keeps plants with the food they need to be their most productive.

You may be thinking, I can’t do compost because I don’t have space in my yard.  Well, this is not the case!  There are a couple of ways those of us with small yards or no yard can create our own compost.  

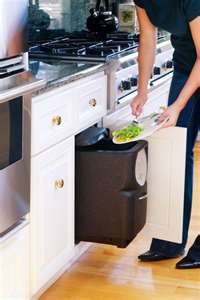
Naturemill composter
kept in a kitchen cabinet
Naturemill composter in action
Naturemill (http://www.naturemill.com) has an electric composter that you can keep in your house, in your garage, or outside and uses $0.50 of electricity a month.  I have had one for a couple of years and I love it!  Makes me feel good not throwing all our food scraps in the trash or down the disposal.  And it gives me compost year round for my flowers and veggies.  It gives you 1.5 gallons of compost in a couple of weeks. 


Purchased vermicomposter
Homemade vermicomposter
Another small space option is vermiposting or vermicomposting.  This is composting with worms.  It is not complicated.  A simplistic overview-you shred up newspapers, dampen them, put them in a plastic container with holes in the bottom, then add worms, with more shredded paper on top and cover with a lid.  You add produce to feed them.  Many recommend adding the produce in a corner of the bin.  As it is eaten down, add more scraps in another corner.  Worm populations double every 2-3 months.  After all the bedding is turned into brown castings, you screen out the worms, use the worm castings in your garden, and start the process all over again.  Red wrigglers are the recommended type of worm to use.  They cannot get below freezing.  Here is a blog to learn more: http://vermicomposting.com   They also sell everything you need to start your own worm farm.
Traditional compost pile system
 If you have space, you can either get a tumbler that you throw your scraps in and crank daily or do a “pile.”  For the pile approach, you have to layer your compost to get it to heat up to temp for decomposing.  You need a layer of brown material then a layer of green material in equal amounts.  Browns are dried leaves, hay, straw, wood shavings, grains, crackers, corn chips, bread.  Greens are the rest-manure, food scraps, fresh grass clippings, fresh plant trimmings, coffee grinds, meat, fish bones, cheese, eggs.  For good nitrogen, if you don’t have manure or coffee grinds, add another organic nitrogen source like blood meal.  A pile needs to be moist so after you have it created, water it well.  
Tumbler type compost pile

Be careful of adding in any diseased material or weed seeds.  If your pile gets hot enough, it will destroy the disease/seed.  If not, you will get a nice crop of weeds.  Your pile will need to be at least 3 feet by 3 feet to get to the 130-150 degrees necessary to sterilize the compost.
Now the question is, do you turn the traditional pile or let it lay.  You can do either.  Turning the pile, gets more oxygen to hasten the decomposition.  You get compost faster this way, but it is not required.

Permaculture sheet mulching
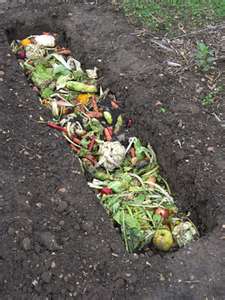
Some suggest digging a farrow in the fall where you will plant next year, adding your green and brown, and covering back up with dirt.  This is called trench composting.  Permaculture's sheet mulching is very similar, but is placed on top of the ground like the traditional lasagna compost pile, but only about a foot thick.  You’ll have built in, finished compost by spring.  Permaculture would say this is a great strategy as all the microbes, worms, and soil structure that are grown over the winter will stay in place where they are needed for your vegetables.  This is also how the American Indian taught the Pilgrims; placing a rotten fish or eel in the hole of the “three sisters” they grew-maize (corn), beans, and squash.  The rotten fish provides nitrogen and microbial activity.
Trench composting

If you purchase manure or mulch, know the source.  Cattle manure fed hay treated with a systemic herbicide will kill your vegetable plants.  Same for trees made into mulch.  Some of these systemic herbicides in use today stay active for years.

For tips on solving common composting problems, Troubleshooting your compost pile

Winter can be a challenging time to get your compost pile going.  Don't wait to start your own composting.  You can start today!  Just layer greens and browns in a 5 gallon bucket in the garage with some compost starter.  Shake it up daily and you'll have compost going in no time. 

Thursday, December 31, 2015

Controlling bugs the natural, organic way

Stink bug
Thursday, December 31, 2015

There are good bugs and then there are the bugs that eat up your harvest or give your plants diseases.  You have to be extremely careful in applying any insecticides (bug killers) as they will kill off the beneficial insects (like bees) that pollinate your veggies and increase your harvests.

The best approach is to let nature take its course.  If you have bad bugs, the good bugs will quickly follow and provide equilibrium in the garden.   It took a couple of years after going all natural and organic (no bug sprays) for my garden to come into equilibrium.  First come the bad bugs, these then attract the good bugs who come looking for dinner!

 I purchased beneficial insects to speed up the process.  If you go the route of mail order, be sure that you will be at home when they are delivered so that you can get them released as quickly as possible.  Check your local nurseries for beneficial insects as they will be acclimated to your area.

You can encourage good bugs by planting flowers either around your vegetable patch or actually with your vegetables.  Marigolds are a great bad bug (and deer) deterrent.  I plant these all around my flower garden.

You can also encourage birds to your yard by having trees, shrubs and flowers that attract birds.  Keeping a bird bath with shrubs nearby so the birds can hide in the shrubs is a great way to get birds into your yard.  Adding a bird feeder is helpful as well.  If you do, be sure that you feed all through the winter as the birds have come to depend on you.

Using a garden hose to dose down the insects can be a good strategy; just make sure that you are not watering a plant’s leaves that are susceptible to fungal diseases such as tomatoes, cucumbers or zucchinis.  Cucumber beetles look a lot like lady bugs (the good guys), but are yellow or green versus red.  They also spread fungal diseases.
Cucumber beetle

You can also go insect hunting and pull off the insects and throw them into a bowl with soap and water or simply don gloves and squish them and feed to the birds.

For Japanese beetles, I use an attractor that is quite a distance from the vegetable garden.  They also love roses so I go hunting for them on our roses every day.  We also apply Milky Spore to keep the grub population down around the roses so we have fewer adults in the summer.

For ants, you have to control the aphids.  A recipe for catching the ants and aphids:  2 cups of vinegar, 2 cups of sugar, 2 cups of water in a gallon jug with a lid.  Drill 3 small holes in the lid, large enough for the ants and aphids, but too small for a little bee.  Place in trouble areas.

Diatomaceous earth sprinkled on the plants that the grasshoppers or other insects love will kill them, as it will kill any insect that crawls on the leaves that DE is sprinkled on.  It scratches their exoskeleton causing them to get dehydrated and die.  DE is safe for humans and is even eaten by some for health benefits.  Just realize good insects like bees will also be killed.

Here are some make your own insect deterrents.  Make sure you test on a few leaves to insure that it won’t adversely affect the plant you are trying to protect.
All purpose spray.  1 garlic bulb, 1 onion, 1 teas dry cayenne pepper, 1 teas liquid soap, 1 quart of water.  Mix water, garlic, pepper and onion together in a food processer, let steep an hour or so, drain through cheesecloth, add liquid soap and you are ready to spray away!
Hot pepper spray.  Good for repelling insects, squirrels, rabbits, and other curious mammals.  1 cup of hot peppers in a quart of water.  Mix in food processor, strain through a cheesecloth and you are ready to use.  Be careful to not get the liquid on your hands and then touch your eyes or mouth.  It will burn.
Tomato-leaf spray.  This is toxic to soft bodied insects like aphids.  It also attracts beneficial wasps.  Take the leaves off the bottom of your tomato plant, 2 cups.  Put in food processor with 1.5 quarts of water.  Let steep overnight, strain out leaves.  Spray on affected leaves, especially the undersides where they like to hide.

If you are just overrun with the bad bugs, you can look on OMRI web site to see what the organic insecticides are:  http://www.omri.org/omri-lists  I use Safer Insecticidal Soap and Neem Oil for my indoor plants.