Sunday, September 24, 2017

Plant now for winter and spring

Salad burnet in February, tasty in salads
Sunday, September 24, 2017

You can still put out transplants for your winter garden.  Winter producing varieties are the really hardy cold crops that thrive in the cool temperatures of spring, fall and winter. To get the longest harvest possible, look for varieties that say “cold hardy”, “early winter”, “overwintering”, “winter-hardy”, “cold tolerant”, “bred for winter production.”  

With cover, the following will allow you to harvest all winter: arugula, beets, chicory, corn salad, lettuce, mustard greens, parsley root, radicchio, radishes, spinach, and swiss chard.

The following don’t require covering: brussels sprouts, winter harvest cabbage, carrots, collards, kale, kohlrabi, leeks, bunching onions or Egyptian onions, parsnips, rutabagas, turnips, salad burnet.

Any perennial greens can also be planted now.  Your perennial greens and overwintering varieties are the first up in the spring.*Asparagus (planted now for spring)
*Sprouting broccoli (will come back in the spring, too)
*Cabbage (at this point, look for ones with the shortest days to maturity)
*Carrots (can be pulled all winter)
*Chard (will survive winters if placed in a sheltered area)
*Collards
*Corn salad (also called Mache)
Cultivated dandelions (a perennial, harvest all winter)*Egpytian walking onions (harvest all winter)
*Garlic & shallots (planted into late October/early November)
*Kale (winter hardy types survive all winter into spring)
*Lettuce (can germinate at temps as low as 40 degrees F)
*Mustard greens
*Bunching onions (depending on type, ready to harvest late Oct-Dec)
*Overwintering onions (all onions can be left in the ground in Zone 6)
*Overwintering peas (can eat the greens all winter with peas in the spring)
*Radishes (quick to germinate and can be pulled all through winter)
*Rutabaga
*Salad burnet (a perennial)
*Sorrel (a perennial)
*Spinach (many survive the winter to mature in early spring)

Winter lettuce and greens in the mini greenhouse

The transplants provided in nurseries and big box stores this time of year are the ones that are adapted to your area's fall and winters.  You can order onions, shallots, and garlic from many on line catalogs.  I keep trying different varieties every year, looking for the ones that grow well, give the biggest cloves and are easy to peel.

Don't let the coming cold discourage you from edible gardening.  It is not as intense as warmer weather gardening, but with a little planning and some protection, you can have fresh produce all through the winter!

Saturday, September 23, 2017

What's happening in the late September edible garden

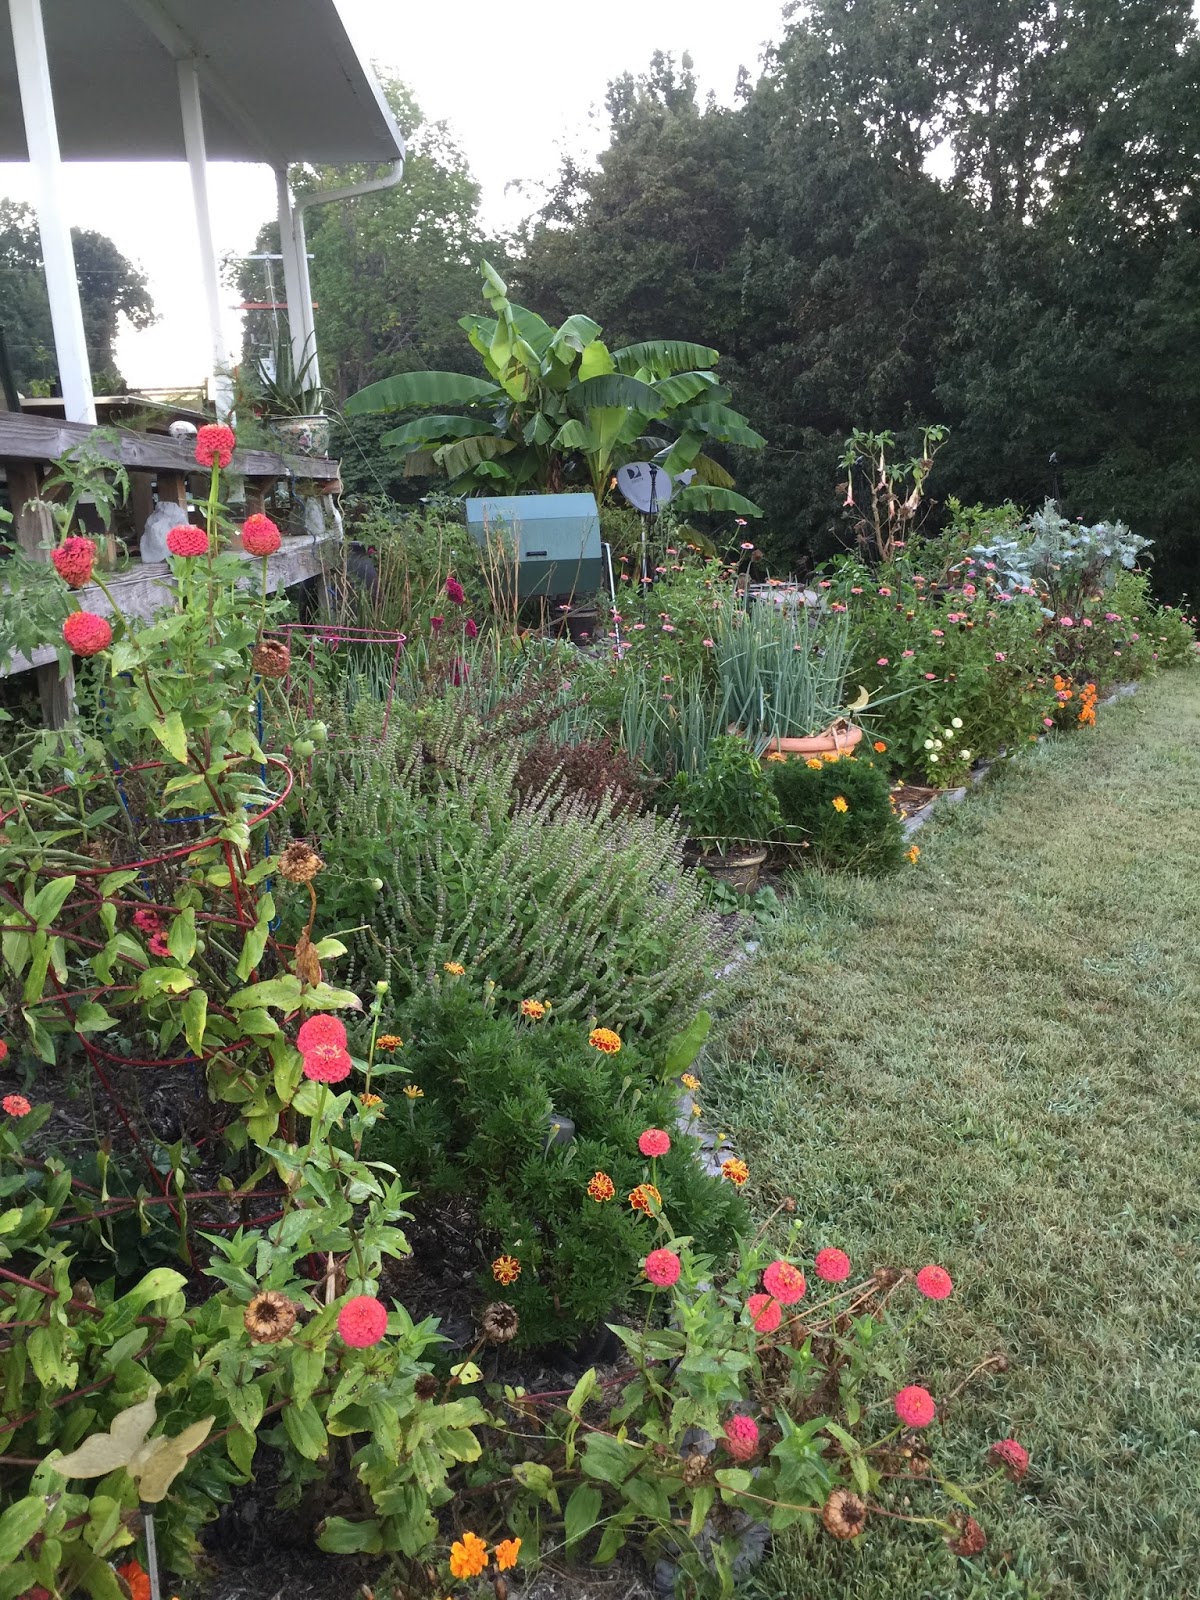
September edible garden in the evening
Saturday, September 23, 2017

The plants that like this kind of weather are tomatoes, eggplant, peppers, Egyptian walking onions, cucumbers, okra, the Mediterranean herbs like basil, rosemary, sage, oregano, chives, savory, dill, tarragon, chard, parsley and thyme.  

Typically, we would be preserving lots of veggies for year round eating at this time of the year.   We had good rain all summer again this year.  The green beans, peppers, eggplant, okra, chard, walking onions and herbs did great.  The tomatoes did okay, but some plants either died or died back.  I did a second planting of tomatoes in July.  Those plants are now producing ripe tomatoes.

For the plants that survived and thrived, it would be a great idea to save their seeds for replanting in your garden next year.  These are the really hardy ones.  This is how farmers over thousands of years have done seed saving.  Save the seed from the plant that has the characteristics you want and are adapted specifically to your garden.

I finally found a sweet pepper that produces well and is tasty.  I am definitely saving the seeds from these plants!

Italian Red Pear on the fine
I have been putting about two quarts of tomatoes away a week.  Sometimes more.  I just slice them and put them in freezer bags.  When it cools down outside, I look at the frozen tomatoes I have left from last year and cook those into sauce.  You really want to clean out the freezer each year.  The veggies will still be edible if kept longer, but some will loose flavor.  Since last year's harvest was not the best, I don't think I will be doing any canning this fall.  

I tried some new tomato varieties and also planted my standbys.  
-Lucid Gem had fun colored fruits but the vine wasn't sturdy enough to hold the fruit and I didn't get a lot of them either.  
-Cherokee Purple did well.
-Italian Red Pear an heirloom paste had a health vine, but ripened late and took a long time.  I planted it in more shade than last year, so will plant in full sun next year.
-Principe Borghese did not do well.
-I tried the Chocolate Pear again this year and the vine died back early.  I don't think I will try it again.
-Small and medium yellow storage tomatoes from Sicily.  The small ones did fine.  The medium just never ripened.
Black Vernissage-did not do great.
-Patio Princess for the pot did very well.  I will do it again
-Rosella did great.  They are the size of marbles.  I don't think I will grow again.

The squash did well early in the season, then the zucchini died from disease.  The yellow prolific kept producing into the beginning of this month.  I liked both varieties I tried this year and will do those again next year-Early Prolific Straightneck and Cocozelle.  It is recommended you either wait until the second week of June to plant your squash or do a second round of planting in July to have healthy plants for the entire summer.

I have several eggplants going this year.  The Turkish Orange did not do as well as in years past.  The flea beetles loved it.  The white and purple both did well.  The white varieties have the least bitterness, but are very hard to grow from seed.  I think I will bring the white one inside for the winter instead of trying to get a new plant started from seed next year. 

I have been able to freeze about a pint of sliced peppers every week.  I had 6 sweet pepper plants.  I had planted a few seeds from sweet banana peppers I bought at the store that I grew out last year.  They didn't look anything at all like a banana pepper, but they tasted great and did extremely well.  There are three that I  saved seeds for next year's garden (a yellow, a red, and a maroon).

I also grew from seed the red hot pepper from Sicily-Bocca Rossa.  It did very well.  It is always covered in peppers.  The Pablano pepper plants have done okay.  I grow those to make chili powder.
I have a small hot pepper plant that is ages old, Chiltepin.  It took 3 tries, but I was finally able to get it to grow.  I have them in a pot that I will bring in to overwinter again.  I like putting small hot peppers in my seasoned salt and wanted to grow my own.  They are covered with the tiny hot tots!  

If you want to maximize your pepper harvest, pick them as soon as they get to full size versus letting them fully ripen to red, yellow, or orange on the plant.  This stimulates the plant to produce more.  If you let them ripen on the plant, the taste will be sweeter.  I compromise and take them off just when they start to turn.  They complete ripening on the counter in a few days.

The cucumber vines did okay.  The first set of cukes had 50% die back.  The one left produced for a couple of months.  I started another in the garden and it is still producing, but not a lot.  The plant looks healthy.  The cukes I get from this plant have a shelf life of 2 months or longer just sitting on the counter.  It is amazing.  They will also get huge.  This heirloom (Jaune Dickfleischige) produces yellowish orange skinned fruits.
View between the pole beans in the edible garden
The pole green beans did great this year, but have died back in the last couple of weeks.  I planted purple and green Romano types.  The beans and flowers were very pretty.  The green Romano were stringless and the purple Romano type had a small string that was easy to remove before freezing.  I will definitely keep these (Romano and the purple Blauhilde) in my garden next year.  Also interplanted with Scarlett Runner beans, too, for their beautiful flowers.  These are edible as well either as green beans or if left on the vine as storage beans.  Next year, I'll keep them separated so I know when to pick them.  

I tried three pole storage beans this year-Portal Jade, Good Mother Stollard and King of the Garden lima beans.  The Portal Jade and the Lima beans did not produce much.  Good Mother Stollard went to town!  I got quite a lot from these vines and they are still producing.  I'd do these again.  I'll likely try some other varieties with this one next year to figure out a variety that likes our garden conditions.  I think it is fun to have different color and sized beans in the chili I make.

I planted okra for the first time this year and these guys did fabulous.  I planted two varieties-Red Burgundy Okra and a green variety.  Both did very well.  I think I will stick with the Red Burgundy for future gardens.  I didn't realize how tall okra gets!  Some of these plants grew to 8+ feet tall.  They produced all summer long and are still producing and growing in height.  I think we got enough this year that I won't need any in the garden next year.  I just sliced and froze them.  I am planning on using them in soups and roasts.  They were pretty tasty just boiled in a pan of chicken broth.
Our very tall okra
I am still fertilizing monthly.  I use Espoma as it is all natural, organic.  This year we added a nice thick layer of compost in the spring.  Compost increases organic matter and supercharges the microbes in the soil.  The microbes help your plants roots to take up the nutrients they need.  I think we'll put the compost on this fall instead to let the nutrients seep into the soil over the winter.

The garlic and onions did well this year.  The Egyptian walking onions did great!  I hardened the garlic on our covered deck.  I put it in apple cider vinegar with peppers for keeping in the fridge.  We use garlic year round for cooking and on our garlic cheese bread.  Yum!
I had a bumper crop of basil this year; most were Holy Basil volunteers from last year's garden.  The other herbs did well, too.  We have rosemary, tarragon, bay, sage, parsley, chives, and mint.  I keep peppermint and orange mint in a pot so it doesn't take over the garden. The dill went to seed early.  The cilantro is sprouting again for a second round in the cool weather.  I'll get to add it to our salsa now until winter.  I use tarragon in the summer after the cilantro has bolted.  It adds a different taste, but is still good.
Sprouting lettuce seed in Earthbox

I had also reseeded the Earthbox but something ate most of the lettuce that sprouted.  I'll need to do another round of seeds so we can have some lettuce when the weather cools down.  We will cover the Earthboxes with a small portable green house later this fall so we can have salads throughout the winter.

Make sure you save the seeds from your best and longest producers to plant in your garden next spring.  I also save seeds from organic produce I get from the store that is really good.  Last week end when we were at the grocery store, there were these beautiful medium sized burgundy tomatoes.  I bought the biggest, prettiest one they had.  We enjoyed the tomato and saved the seeds.    Next year, we'll be able to have them in our own garden!

This fall, we will have arugula, mustard greens, lettuce, chard, blood veined sorrel, garden sorrel, French and Italian dandelion, spinach, lettuce, purslane, corn salad, chives, parsley, and sprouting broccoli for salads.  Eggplant, peppers and tomatoes will produce until the first freeze.  The Egyptian onions will produce all through winter.  The herbs will be available for harvesting until the snow covers them up.

Sunday, September 17, 2017

September edible garden tips

Mid-September edible garden
Sunday, September 17, 2017

The garden is winding down in this mid-September.  Here are some things to do in the garden in September

If you are not using all the space in your garden, you can use green “manure” over the winter to add nutrients, suppress weeds and prevent soil erosion of your garden bed.  To add fertility to the soil, sow green manures in the garden this month, let them grow through the winter, then dig-in in early spring.  

Green manures include things like legumes for nitrogen and organic matter (Australian field peas, small fava, banner fava, hairy vetch, common vetch, and vernel summer alfalfa) and clovers for breaking up soil and lots of organic matter (miniclover, new zealand white clover, crimsom clover, fixation balansa clover, mammoth red clover and berseem clover)

Allow at least two weeks between tilling under and planting your spring garden veggies.

To stop pumpkins, cucumbers, summer squash, ornamental gourds, and tomatoes from growing and stimulate ripening, pinch out the ends  of the shoots.  Green tomatoes can be placed near a banana to help ripening.

Check apples and pears for ripening.  Early apples should be picked and eaten.  Gather pears before ripening and let them finish ripening indoors.  Finish pruning the apples and pears by cutting back new growth, particularly on trained trees such as espaliers and cordons.

Order your spring blooming bulbs like daffodils, tulips and hyacinths now for planting in October and November.    

Order your garlic for planting in October and November.

Certain seeds can still be planted for winter harvest or for early crops next year, these include arugula, beets (Flat of Egypt, Touchstone Gold, Avalanche, Boldor), cold hardy winter salad mixes, carrots (for baby carrots and spring harvests),  corn salad, fava beans (Aquadulce, Robin Hood & The Sutton), mustard greens, bunching onions, parsley root, overwintering peas (Australian field peas, Meteor and Douce Provence),  snow peas (Green Beauty, Little Snowpea), radishes (Celesta, Runder Schwarzer Winter, Roxanne, Sweet Baby, Dragon, Sora), perpetual spinach, turnips (Tokyo Cross, Purple Top, Just Right) and winter lettuces (Winterwunder, Wintergreen, Winter Brown, Artic King, North Pole, Winter Density, Joker).  

Look for cold hardy types with short “Days to Harvest” on the seed packet.

Now is the time to also start the clean up of the garden beds.  I leave my flowers so that the birds can eat the seeds over the winter.  Any diseased foilage, do not add to the compost to keep it from spreading.  All the rest goes into the composter. 

Saturday, September 9, 2017

Outdoor seed starting tips


Saturday, September 9, 2017

This is a great time of year to start cool loving greens like lettuce, spinach, kale, mustard, and chard. Peas, carrots, broccoli and cabbage also enjoy cool weather.  What are the tricks to successful outdoor seed starting?  

You have several options for outdoor seed starting.  You can start directly in the garden, start in coir pots, or start in regular pots and then transplant into the garden.  

Be sure to follow the directions on the seed packet for how deep to put the seed.  For 
Days to Harvest", add 2 weeks for fall planting as we are getting less daylight as the weeks go by in the fall.  A risk with small seeds and seedlings is their ability to break through a hard crust of soil.  Large seeds like peas I will start directly in the garden because they are strong enough to push through even mulch.

Small seeds, I like to start in a pot, sowing thickly.  As the seedlings emerge and get to a sturdy size, I will then move from the pot to the garden.  I just find it easier to keep an eye on a seeding pot and keep it moist rather than the garden this time of year.  Don't keep the soil constantly wet or the seeds will rot before they have a chance to sprout.

Use a trowel to dig small lines into the soil for planting greens

You can start small seeds even in mulched beds.  Just trowel a line in the mulch down to the soil, plant the seeds, and then cover lightly with potting soil.  Potting soil will not get a hard crust like mulch or regular dirt.  Keep moist until the seedlings are a sturdy size, then water as normal.

You can also start seeds in pots you make yourself with newspaper, toilet paper cores, paper towel cores, or paper cups and sterile, organic seed starting mix.  A nifty way to do it is to cut used paper towel cores into sections and line with old newspaper.  You can plant the whole thing or push out the newspaper insert and compost the core.


Paper towel cores with paper towel bottoms

Another option is to use coir pellets and coir pots.  Peat is not a renewable resource so I like to use coir, a renewable substitute for it now on the market.  Just read the labels.  I just bought ones made with coir at Lowes or you can order on Amazon or eBay.

In the spring, I use sterile seed starting mix, pots, containers and trays.  You can make your own seed starting mix with peat moss or coir (renewable), compost, and vermiculite. You can heat the compost to at least 150 degrees to kill any pathogens before using to start seeds.  In the warm fall days, I just plant into regular potting soil in pots.


Newspaper seed starter "pot"

Water the soil thoroughly and then plant the seeds.  When you water before the seeds come up, be sure to use a gentle spray so you don't wash the seeds away.

Make sure you label your seedlings as soon as you plant them; you may think you will remember 2 months from now what was where, but likely not!  Now is also a great time to start keeping a journal.  Start tracking what you planted when so you can review next year what worked well to repeat and what didn’t work so well to tweak.

Small seedlings
Your seedling’s first leaves are not “true” leaves, think of them as baby teeth.  The second set of leaves are their true leaves.  They are ready to be hardened off when they have their first set of true leaves.  Seedlings must get used to the sun if you are starting on a covered deck or porch.  You take move them to a spot where they get more and more sun,  gradually increasing their exposure to sun.  I try and plant into the garden when there is rain and clouds forecasted to minimize the shock.

Sturdy seedlings, ready to transplant into the garden
There are fall transplants also available at nurseries and local hardware stores like broccoli and cabbage if you just want to pick up and plant right now.

I like to save seeds from my best producers and replant.  Seed saving-fun, easy and a cost saver

Sunday, September 3, 2017

Preventing and treating powdery mildew

White spots-powdery mildew on squash leaves

Sunday, September 3, 2017

You can tell it is late summer by the emergence of powdery mildew and other fungal diseases on your veggies and some flowers like roses and peonies.  There are things you can do to treat or minimize powdery mildew.

Powdery mildew loves squash!  It shows up during hot and high humidity conditions.  It can also be encouraged by overhead watering.  The best watering method is some type of slow drip at the roots of your veggies.  This gets the most actually in the ground to the plant and minimizes evaporation (reducing your water bill).  Summer garden tips

Also important is good space between plants that are susceptible to fungal diseases.  This allows good air flow which reduces conducive fungal conditions.

Overhead watering, besides encouraging mildew and other fungal diseases, can also remove the insects that pollinate the veggie flowers and even the pollen itself, leading to low harvests.

Powdery mildew can be treated by spraying the top and underneath of all leaves with a baking soda solution, copper or fresh whey.  An easy to make, low cost spray is as follows:  2 tbl of baking soda, 1/2 teas of gentle dish soap, 1 gallon of water.  Wet top and bottom of leaves thoroughly.  Reapply after a rain.

You can also purchase organic mildew sprays, like Safer.  For info on organic pest control, Natural, organic pest strategies and how to make your own bug sprays

Be careful in using sprays; they may be too harsh for some vegetable plants and some areas of the country where it gets scorching hot.  Test them on a small area of your plant, wait for a sunny, hot day to pass before spraying the whole plant.  Copper based sprays work great on my peonies, but not so well on my squash.

Many recommend if you cannot get rid of the mildew with a spray, you should remove any diseased leaves and throw away so it doesn't spread to other plants.  Do not compost because if you do not get internal temps in your compost at 140 or greater, it will not kill the spores and you will be spreading the fungus wherever you spread the compost.

A boost of potassium is good this time of year for your veggies.  Nitrogen supports the greenery of your plants while potassium supports the blooms.  Keeping your plants well fed helps them stay healthy and producing well into fall.  I fertilize monthly.  You can even make your own fertilizer inexpensively.  Make your own fertilizer, it's all natural and inexpensive

I have begun to start a second batch of zucchini and tomatoes around the 4th of July and replant into the garden in late July.  As the early planted succumb to fungal diseases or just plain get tired, the new plants come on to take up the slack.  Summer squash come on quick.  This won't work for winter squash as they require a much longer growing time to produce their fruits.

Saturday, September 2, 2017

Try self-seeding veggies and flowers

Bee on zinnia in the edible garden

Saturday, September 2, 2017

An easy option for a plant once and be done are self-seeders.  These are plants that produce many seeds.  One trick to self-sowing is letting the seeds sprout before adding a thick layer of mulch which may dampen how many seedlings can push up through the crust if put down before they have a chance to sprout.

There are many self-seeding vegetable and herbs.  Here are a few we are growing:
*Arugula
*Borage
*Cilantro
*Dill
*Purslane
*Sorrel
*Basil
*Marigold
*Spinach
*Lettuce
*Chard
*Mache (corn salad)
*Miner’s lettuce (claytonia)
*Giant Red mustard
*Peppers
*Tomatoes
*Brilliant Red orach
*Celery
*Nasturtiums
*Chamomile
*Calendula
*Cocks comb
*Hummingbird vine
*Morning glory
*Sunflowers
*Zinnias

The trick to self-seeders is you have to let them go to seed in the garden.  That means leaving the brown flower heads on or the dropped tomatoes on the ground so they can leave their seeds.

I have "volunteer" tomato plants that sprout every year, here and there.  They are easy to pop out of the ground and plant where you want them or leave them where they are.  I always let them grow because they must be happy and adapted to my garden conditions.  It is always a surprise to see what type of tomato it is.  I had an orange cherry type and a chocolate paste type that did well as volunteers this year.

In the garden right now, I have cock's comb and zinnias that have filled the garden.  There are baby cilantro and lettuces popping up.  I'm hoping spinach starts coming up soon!
  
A caution with growing self sowing plants is that they can self sow a little too well.  The only one on the above list that I would not let loose in my garden is the purslane.  I only let it grow in pots.  The rest are easy to pluck out the ones you don’t need.