Monday, May 28, 2012

The wonderful world of squash


Monday, May 28, 2012

Squash is amazing.  It spans from huge pumpkins to small petit pan squash.  They have an amazing array of sizes, shapes, and tastes.
Squash originated in Mexico.  There are cave drawings from 8000 to 6500 BC depicting squash.  Squash was grown extensively by Native Americans as part of the “Three Sisters”-squash, corn and beans.
Squash love organic matter.  If you throw a few seeds in your compost pile, you will be rewarded with exuberant vines.
Plant when nighttime temps are 55F or warmer.  Add a fertilizer rich in phosphorous a week after transplanting, when flowers first appear and again when fruits begin to form.  They love water, too.  If growing in a pot, keep well watered and don’t let dry out.
Don’t panic when the first blooms fall off without producing any fruits.  There are male and female flowers.  If yours falls off, it was likely a poor guy that withered without the love a gal.  There can also be some false starts with malformed fruits.  Don’t worry, the plant will put on more blooms and you will be on your way to zucchini overload before you know it!
Baby acorn squash, blooms still attached
There are two basic categories of squash-winter and summer.  
Winter squash are those that take until late fall to ripen and can be stored inside for months (I still have a butternut squash in my pantry from last year).  They include butternut squash, acorn squash, spaghetti squash, Hubbards, turbans and pumpkins.  Each vine does not produce many fruits.  We got 3 butternuts off our vine last year, which is a decent yield.
Winter squash you typically leave on the vine until the vine dies and the fruit loses its sheen.


There are some amazingly diverse and cool winter squashes/pumpkins, from the bumpy and blue hubbards, to traditional pear shaped butternut to the exotic "turban" squash, so named because of the hat it appears to be wearing............  


From left to right-turban, hubbard, and butternut squash


Baby zucchini squash, blooms still attached
Summer squash can be harvested all summer long.  I have grown them successfully for years in a pot.  This year I have one planted in the flower bed and it already has several babies on it!  Summer squash include the ever popular zucchini, cushaw, pattypan, and yellow crookneck.
If growing summer squash in a pot, look for the bush varieties.  These are much more manageable.
Zucchini is notorious for getting huge overnight.  It is important to pick summer squash when smaller.  As they grow large, they become very seedy and just don’t taste nearly as good!  Check them daily.
If left to grow too large, you can always use them for zucchini bread which is delicious.


The two biggest pest problems are squash bugs (left) and squash vine borer (below left are eggs and right is the adult).


Inspect the plant for squash bugs.  You can wear gloves, pick them off and throw them in a bowl of soapy water.
The squash vine borer is best thwarted by planting early or late.  They fly in mid-June.  If planting early, be sure to inspect regularly the stems for any eggs.  Scrap off any that you find.  When the eggs hatch, the catepillar will dig into the vine and eat its way through its length.  You will have a strong plant one day and a wilted on the next.  The good news is that if this happens, you can replace with another one.  They grow quickly.


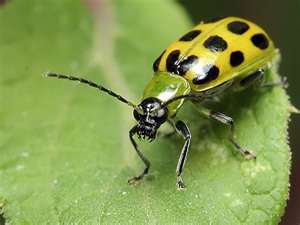
The cucumber beetle can infect the plant with a bacterial disease called wilt or cucumber mosaic virus.  The cucumber beetles we get here look like yellow/green lady bugs (left).  There are also striped varieties (below).


Again, the gloves, pick and throw in soapy water technique works.  Or if you are not squeamish, you can just squish them.
In late summer in areas with high humidity, you can get powdery mildew.  This can be treated by spraying with baking soda, copper or fresh whey.

Sunday, May 27, 2012

Want steamed greens year round-grow chard!


Red Chard-Edible & Ornamental
Sunday, May 27, 2012


Chard has been around for centuries.  It hails from Sicily and was known as sicula.  No one is quite sure how it became known as Swiss Chard.


Chard is a wonderful green, chock full of vitamins.  It can be eaten when small in salads.  The large leaves can be harvested for steamed/cooked greens.  The stems can be steamed or braised as a substitute for celery.

It is a perennial in our Midwest garden.  It grows in all seasons.  Only the coldest weather kills it back to the ground, if not covered.  It is one of the first thing to sprout in the spring.
For the mildest taste, plant chard in fertile soil and do not let get water stressed.  
It is also ornamental if you pick one of the many beautiful colored ribs-shades of red, orange, pink, yellow.
Chard handles the summer heat.   Like most greens, the more you harvest it, the longer before it bolts.  Even with seed heads, the taste does not become too strong when steamed.  You should harvest the outer, lower leaves frequently to stimulate new center leave growth.
"Perpetual Spinach" Chard
As it gets warmer, the white ribbed Chard in our flower bed, "Perpetual Spinach", remains mild in taste.  

Chard can grow in about any condition or soil, even shade.  For the best growth, fertilizer, compost and water are rewarded.  To keep the taste mild in summer heat, keep chard watered.

For the most succulent leaves, harvest in the morning or right after a rain.

Chard is a power house of nutrients.  It is an excellent source of vitamins B6, thiamine, C, E, K; contains fiber, carotenes, chlorophyll, and several minerals-potassium, iron, manganese, calcium, selenium, zinc, niacin, folic acid and even protein.  To top it off, chard is very alkalizing for the body and considered one of the most potent anti-cancer foods.

Thursday, May 24, 2012

How to prepare a bed for planting?


Thursday, May 24, 2012

This depends on where you are starting your bed.  If you are carving out an area from turf, I think the best is what is called “sheet mulching”  and preparing your bed the year before you want to plant in it.

The first thing you want to do for any bed is to have a soil test done to see what amendments your soil needs.  You can get a do it yourself kit or take some soil into your local extension office.

With this technique, you create a lasagna that snuffs out the grass and builds amazing soil.  You start with a thin layer of soil amendments (lime, greensand, rock dust, etc.), then a thin layer of manure (or other nitrogen rich source), then a layer of cardboard or newspaper 1/4 to 1/2” thick and well overlapped, then another layer of manure, 8-12” of hay/straw/yard waste, 1-2” of compost, all topped by 2” of straw/wood chips/sawdust/leaves/other seedless mulch.  Wet each layer as it goes down.  The lasagna needs moisture to get cooking.

If you use regular mulch as the top layer, it will look like a typical flower bed.

You can use a broadfork before you start for holes deep in the soil so nutrients and microbes can penetrate further into the earth.

By spring, you will have a garden spot teaming with worms, microbes, greatly improved soil structure, rich black soil, and ready to plant.

A second technique is to till in compost and fertilizer.  The cons to this are that a “hard pan” is created where the tiller tines scrap on bottom, it destroys soil structure and microbial colonies, and it oxidizes the soil, causing a quick burn off of the nitrogen and carbon in the soil.  You’ll have a great garden for a year or two, but you are using up the nutrients at warp speed.  Last, it is a lot of work and tillers aren’t cheap.

Friday, May 18, 2012

It is that bolting time of year.....


Bolting kale, romaine, lettuce, and cilantro from left to right

Friday, May 18, 2012 

It is that time of year, all those wonderful, sweet spring greens are bolting for the sun!
Kale, broccoli, lettuce, chard, sorrel are all bolting in my garden this time of year.  Their stalks reach for the sun with their little yellow flowers poking their heads out.  The pollinators love these little flowers.
The leaves are still edible, but can be too bitter for many tastes.
It is so hard for me to do, but it is time to yank out the spring greens and replace with the summer veggies.  My hubby helps me out on this one.  I share with him which ones should go and he is happy to tidy the garden up for me.
Chard and sorrel can be left in the ground, but you have to keep a good check on their seed stalks or your garden will be overrun by these opportunists!
The garden does look so much neater with the overgrown spring greens out and the summer babies planted................

Thursday, May 17, 2012

How to keep greens going in the summer


Baby Summer Crisp lettuce

Thursday, May 17, 2012

Summertime is much more challenging for growing greens.  Most “bolt” when temps start hitting the upper 70’s and 80’s.


Greens that have bolted are still edible, but most become bitter tasting.  


Tricks to keep greens growing all summer is shade, progressive sowing, perennial greens, early morning harvesting and choosing varieties that are resistant to bolting in warm weather.

For shade, there are options.  You can grow your greens in pots and move them to the East or North side of the house.  You can cover them with a sun cloth.  Or you can plant them behind or amongst taller summer veggies.  You can also plant in a micro climate that provides cooler temperatures, say against a wall that is shaded most of the day.  Greens do need sunlight, but in the summer, there is good light reflected so 6 hours of direct sunlight is not a necessity.
For lettuce, it is critical to do progressive sowings.  The typical recommendation is every 2 weeks.  I actually resow about once a month.  The difference is because I take the outer leaves from the lettuce we grow so the plants produce over a longer period of time without bolting.  If you want to harvest full heads, then every 2 weeks is the advice to follow.
Perennial greens will continue to produce all summer.  Chard, sorrel, New Zealand spinach, arugula, salad burnet, French or American dandelion (French dandelion has been cultivated specifically for salad greens so its leaves are much larger than the American dandelion, but both are good for eating!) radicchio, and chives are great for salads.    Pick the youngest leaves for salads and use the more mature leaves of chard, radicchio and sorrel for cooked greens.  Picking right after a rain or first thing in the morning also gives the sweetest leaves.
I keep my greens separated into 3 categories-those for spring/fall, those for winter and those for summer harvests.  Any do great for spring/fall.  Winter and summer greens have a much narrower field of suitable candidates.
Summer candidates I am growing this year:
*Spinach-Summer Perfection, New Zealand Spinach (not a true spinach but has a spinach like flavor)
*Lettuce-Nevada Summer Crisp, Red Sails, Rouge d’Hiver, Freckles Romaine, Summertime Crisphead, Tomahawk, Loma French Crisp
*Red Leaf Amaranth
Nevada Summer Crisp Lettuce does very well in hot temp’s.  I have been growing summer crisp for a few years now.  It volunteers itself all around the garden.  It is a pretty, ruffled lime green lettuce.

Saturday, May 12, 2012

Companion planting

Lettuce planted with companion strawberries and cucumbers

Monday, May 12, 2012

Most have heard of the 3 Sisters-corn, beans and squash planted together.  This is an example of companion planting-planting veggies together that help each other out.  Plants can give off chemicals, create usable nitrogen, have scents, suck nutrients or bring nutrients to the surface that can be either beneficial or detrimental to those planted near them.


For small gardens that cannot do the traditional crop rotation, companion planting is even more important to the long term health of the garden.  
Here is a list of companions for the veggies I have planted:
*Beets-lettuce, onions, cabbage
*Chard-lettuce, onions, cabbage
*Cucumber-beans, nasturtiums, leeks, onions, peas, radishes, sunflowers
*Lettuce-radishes, strawberries, and cucumbers
*Onions-summer savory, chamomile
*Peppers-basil and okra
*Spinach-strawberries
*Tomatoes-asparagus, basil, carrots, celery, chives, garlic, onions, parsley
*Squash-icicle radishes, nasturtiums

Just plant the companions next to each other to help each out.  To get the most from your small space, check out how to do intensive gardening

Thursday, May 10, 2012

Is May too late to start a garden?


Peppers and chives

Thursday, May 10, 2012

Mid-May is here and for those that are just starting to think about getting their garden going, they wonder, is it too late?


It is not too late!  Actually, for the Midwest, Mother’s Day is the bell weather date for being able to safely plant annuals and veggies are for the most part annuals.


This is the perfect time to get cucumbers, eggplant, peppers, squash, melons, tomatoes in the ground.  They love the warmer ground temps!

Mediterranean herbs are also heat lovers.  Rosemary, sage, thyme, sweet bay, basil, chives are all great bets for planting in summer.

Tuesday, May 1, 2012

Tricks for great tomatoes


Young tomato plant in "V" pruning

Tuesday, May 1, 2012
There are a few tricks to know about growing tomatoes. The first is knowing what type of tomato to purchase. 

There are two types of tomatoes-indeterminate and determinate.  Determinate grow to a set height and fruit sets all at once.  This can be a great candidate for canning if you would like to get your tomato canning done all at once.  Indeterminate continue to grow and yield fruits (yes, the tomato is actually a fruit) until frost.  These are the best for fresh tomatoes all season long.

I grow only indeterminates.  For what we don’t eat, I freeze whole in quart freezer bags for chili and salsa until fall.  Come fall, I start canning the surplus.  Right before the first frost, I pick all the tomatoes left on the vine and put in a dark place for them to ripen.  We have fresh tomatoes into December.  They are definitely not the same as summer tomatoes, but better than anything you can buy in the store!
With indeterminate tomatoes, they definitely need something to help them grow upwards (although not required, it does make harvesting much easier).  A very sturdy pole can be used and the plant tied onto it as it grows.  The more popular option is a “tomato cage” that the tomato grows up in to.  This is what we use.  It is important to get the cage on while the plants are small or severe damage may ensue when you try to force the gangly plant into it’s cage.
Tomatoes are susceptible to blossom-end rot and fungal diseases.  End rot is typically caused by not having enough calcium in the soil.  The best way to prevent fungal disease is to rotate the plants and not plant them in the same spot every year.  
So, when planting, it is important to provide the right fertilizer and nutrients.  In each planting hole, I added a handful of worm castings and dusted the roots with mycorrhizal life support.  It contains mycorrhizal, vitamins and minerals.  This blend improves soil fertility and the plants ability to take in the nutrition it needs.  It is not all about just the big 3-nitrogen, phosphorous, and potassium.  They are important but vitamins, minerals, and particularly living soil makes a huge difference in how healthy and lush the plants become.  I also added fertilizer made specifically for tomatoes so that they get the calcium they need.
When you plant your tomato, make sure to plant it deeply.  I take off all the limbs except the top couple and bury the plant up to these stems.  Roots will grow from where the removed and buried limbs were.
Now that your plants have the right start, pruning is the next step.  To get the highest yields, it is important to prune your tomatoes.  You want no branches below 12” (some recommend 18”).  You also want to prune the plant to only 2 branches, the center stalk and one side stalk.  You want to keep the “suckers” cut or pinched off as well as the tomato grows.
Now, to on-going watering and fertilizing.  Many think more is better when it comes to watering and fertilizing.  Not so for tomatoes!  What you end up with are tons of greenery, mushy tomatoes, and very few of them.  Some tomato afficiados recommend a deep watering and fertilizer at planting, then again at flowering, and that is it.  I do water when there is a long dry spell.  Overwatering or erratic watering can also cause the fruits to crack.  
If your plant will not flower and fruit with lush green foilage, quit fertilizing and watering.  A little stress should jump start it.
Although tomatoes love hot weather (they will not flower until night time temps get above 55), they also don’t like it too hot.  If daytime temps get above 90 and nighttime temps above 76, the plant will drop its flowers.
If you want to grow tomatoes in a container, you need to either have a really big container for full size tomatoes (5 gallon) or plant varieties that are adapted for containers.  Tumbler, Tiny Tim and Gold Nugget are all good small fruit bearing plants for containers.  
If you grow in containers, you will need to water weekly or maybe even more depending on the container/plant size.

See my blog from January 6th on varieties of tomatoes to grow.