 |
| Traditional compost pile |
Friday, January 1, 2016
Composting makes what veteran gardeners call “black gold.” Compost is alive with microscopic critters that help plant roots take in nutrients while also providing them.
You hear over and over again that the key to healthy, productive plants is great soil. If you are using pots, you can replace your potting soil each year to keep your soil in prime condition. Another option is to mix your old soil 50/50 with either your homemade compost or store bought compost.
You can increase organic matter in your garden beds by adding a thick layer of compost 1/2 inch to 3 inches thick in the early spring. This is also the best time to fertilize. Apply your fertilizer first, then add the layer of compost. This insures the maximum absorption of nutrients without getting washed off. Top the whole thing off with mulch.
Mulch is organic matter, too. It will break down and enrich the soil year after year, increasing the depth of dark, rich soil over time.
A side dressing of compost monthly during the growing season keeps plants with the food they need to be their most productive.
You may be thinking, I can’t do compost because I don’t have space in my yard. Well, this is not the case! There are a couple of ways those of us with small yards or no yard can create our own compost.
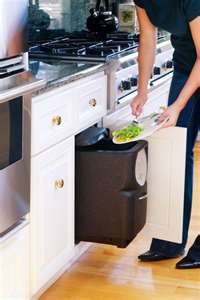 |
| Naturemill composter kept in a kitchen cabinet |
 |
| Naturemill composter in action |
Naturemill (http://www.naturemill.com) has an electric composter that you can keep in your house, in your garage, or outside and uses $0.50 of electricity a month. I have had one for a couple of years and I love it! Makes me feel good not throwing all our food scraps in the trash or down the disposal. And it gives me compost year round for my flowers and veggies. It gives you 1.5 gallons of compost in a couple of weeks.
 |
| Purchased vermicomposter |
 |
| Homemade vermicomposter |
Another small space option is vermiposting or vermicomposting. This is composting with worms. It is not complicated. A simplistic overview-you shred up newspapers, dampen them, put them in a plastic container with holes in the bottom, then add worms, with more shredded paper on top and cover with a lid. You add produce to feed them. Many recommend adding the produce in a corner of the bin. As it is eaten down, add more scraps in another corner. Worm populations double every 2-3 months. After all the bedding is turned into brown castings, you screen out the worms, use the worm castings in your garden, and start the process all over again. Red wrigglers are the recommended type of worm to use. They cannot get below freezing. Here is a blog to learn more: http://vermicomposting.com They also sell everything you need to start your own worm farm.
 |
| Traditional compost pile system |
If you have space, you can either get a tumbler that you throw your scraps in and crank daily or do a “pile.” For the pile approach, you have to layer your compost to get it to heat up to temp for decomposing. You need a layer of brown material then a layer of green material in equal amounts. Browns are dried leaves, hay, straw, wood shavings, grains, crackers, corn chips, bread. Greens are the rest-manure, food scraps, fresh grass clippings, fresh plant trimmings, coffee grinds, meat, fish bones, cheese, eggs. For good nitrogen, if you don’t have manure or coffee grinds, add another organic nitrogen source like blood meal. A pile needs to be moist so after you have it created, water it well.
 |
| Tumbler type compost pile |
Be careful of adding in any diseased material or weed seeds. If your pile gets hot enough, it will destroy the disease/seed. If not, you will get a nice crop of weeds. Your pile will need to be at least 3 feet by 3 feet to get to the 130-150 degrees necessary to sterilize the compost.
Now the question is, do you turn the traditional pile or let it lay. You can do either. Turning the pile, gets more oxygen to hasten the decomposition. You get compost faster this way, but it is not required.
 |
| Permaculture sheet mulching |
Some suggest digging a farrow in the fall where you will plant next year, adding your green and brown, and covering back up with dirt. This is called trench composting. Permaculture's sheet mulching is very similar, but is placed on top of the ground like the traditional lasagna compost pile, but only about a foot thick. You’ll have built in, finished compost by spring. Permaculture would say this is a great strategy as all the microbes, worms, and soil structure that are grown over the winter will stay in place where they are needed for your vegetables. This is also how the American Indian taught the Pilgrims; placing a rotten fish or eel in the hole of the “three sisters” they grew-maize (corn), beans, and squash. The rotten fish provides nitrogen and microbial activity.
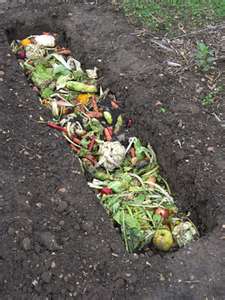 |
| Trench composting |
If you purchase manure or mulch, know the source. Cattle manure fed hay treated with a systemic herbicide will kill your vegetable plants. Same for trees made into mulch. Some of these systemic herbicides in use today stay active for years.
For tips on solving common composting problems, Troubleshooting your compost pile
Winter can be a challenging time to get your compost pile going. Don't wait to start your own composting. You can start today! Just layer greens and browns in a 5 gallon bucket in the garage with some compost starter. Shake it up daily and you'll have compost going in no time.
No comments:
Post a Comment